TradingView Watchlist: Best Setup Guide for Traders (2026)
Affiliate Disclosure: This article contains affiliate links. If you sign up for TradingView through a link on this page, I may earn a commission at no extra cost to you. I only recommend tools I have genuinely evaluated.
Most traders set up a tradingview watchlist once, fill it with random symbols, and never think about it again. Then they wonder why they keep missing setups. A cluttered, unstructured watchlist is not a minor inconvenience — it actively works against you by making the wrong instruments feel equally urgent and hiding the ones that actually deserve attention right now.
Having used professional charting tools across 30 years in finance, I can tell you that watchlist discipline is one of the highest-leverage habits a trader can build. It costs nothing to fix, takes under an hour to set up properly, and changes your daily workflow immediately. This guide covers the complete tradingview watchlist setup — from creating your first list to organising multiple watchlists by market, connecting them to alerts and the screener, and using colour coding to prioritise what actually matters today.
If you do not have TradingView yet, the free plan is enough to follow along with this guide. You can start for free at TradingView — no credit card required.
Quick Answer
The TradingView watchlist lives in the right sidebar of any chart. Click the list icon at the top right to open it. Add symbols using the + button, organise them into sections, and create multiple watchlists for different markets or strategies. Free plan users get one watchlist with up to 30 symbols. Paid plans unlock multiple watchlists with up to 1,000 symbols each on Ultimate. Connect your tradingview watchlist to alerts and the screener for a complete market monitoring workflow.
How to Open the TradingView Watchlist
The tradingview watchlist is accessible from any page on the platform — you do not need to be on a specific chart to open it. From Supercharts, look at the far right side of the screen and click the list icon at the top of the right toolbar. The watchlist panel opens alongside your chart immediately.
At the top of the panel you will see the watchlist name with a dropdown arrow. Below that is a column header row showing Symbol, Last price, Change, and Change percentage. Your symbols appear in the rows below, organised by any sections you have created. According to TradingView’s official watchlist documentation, the watchlist is available from any page and product on the platform — including the screener, charts, and mobile app.
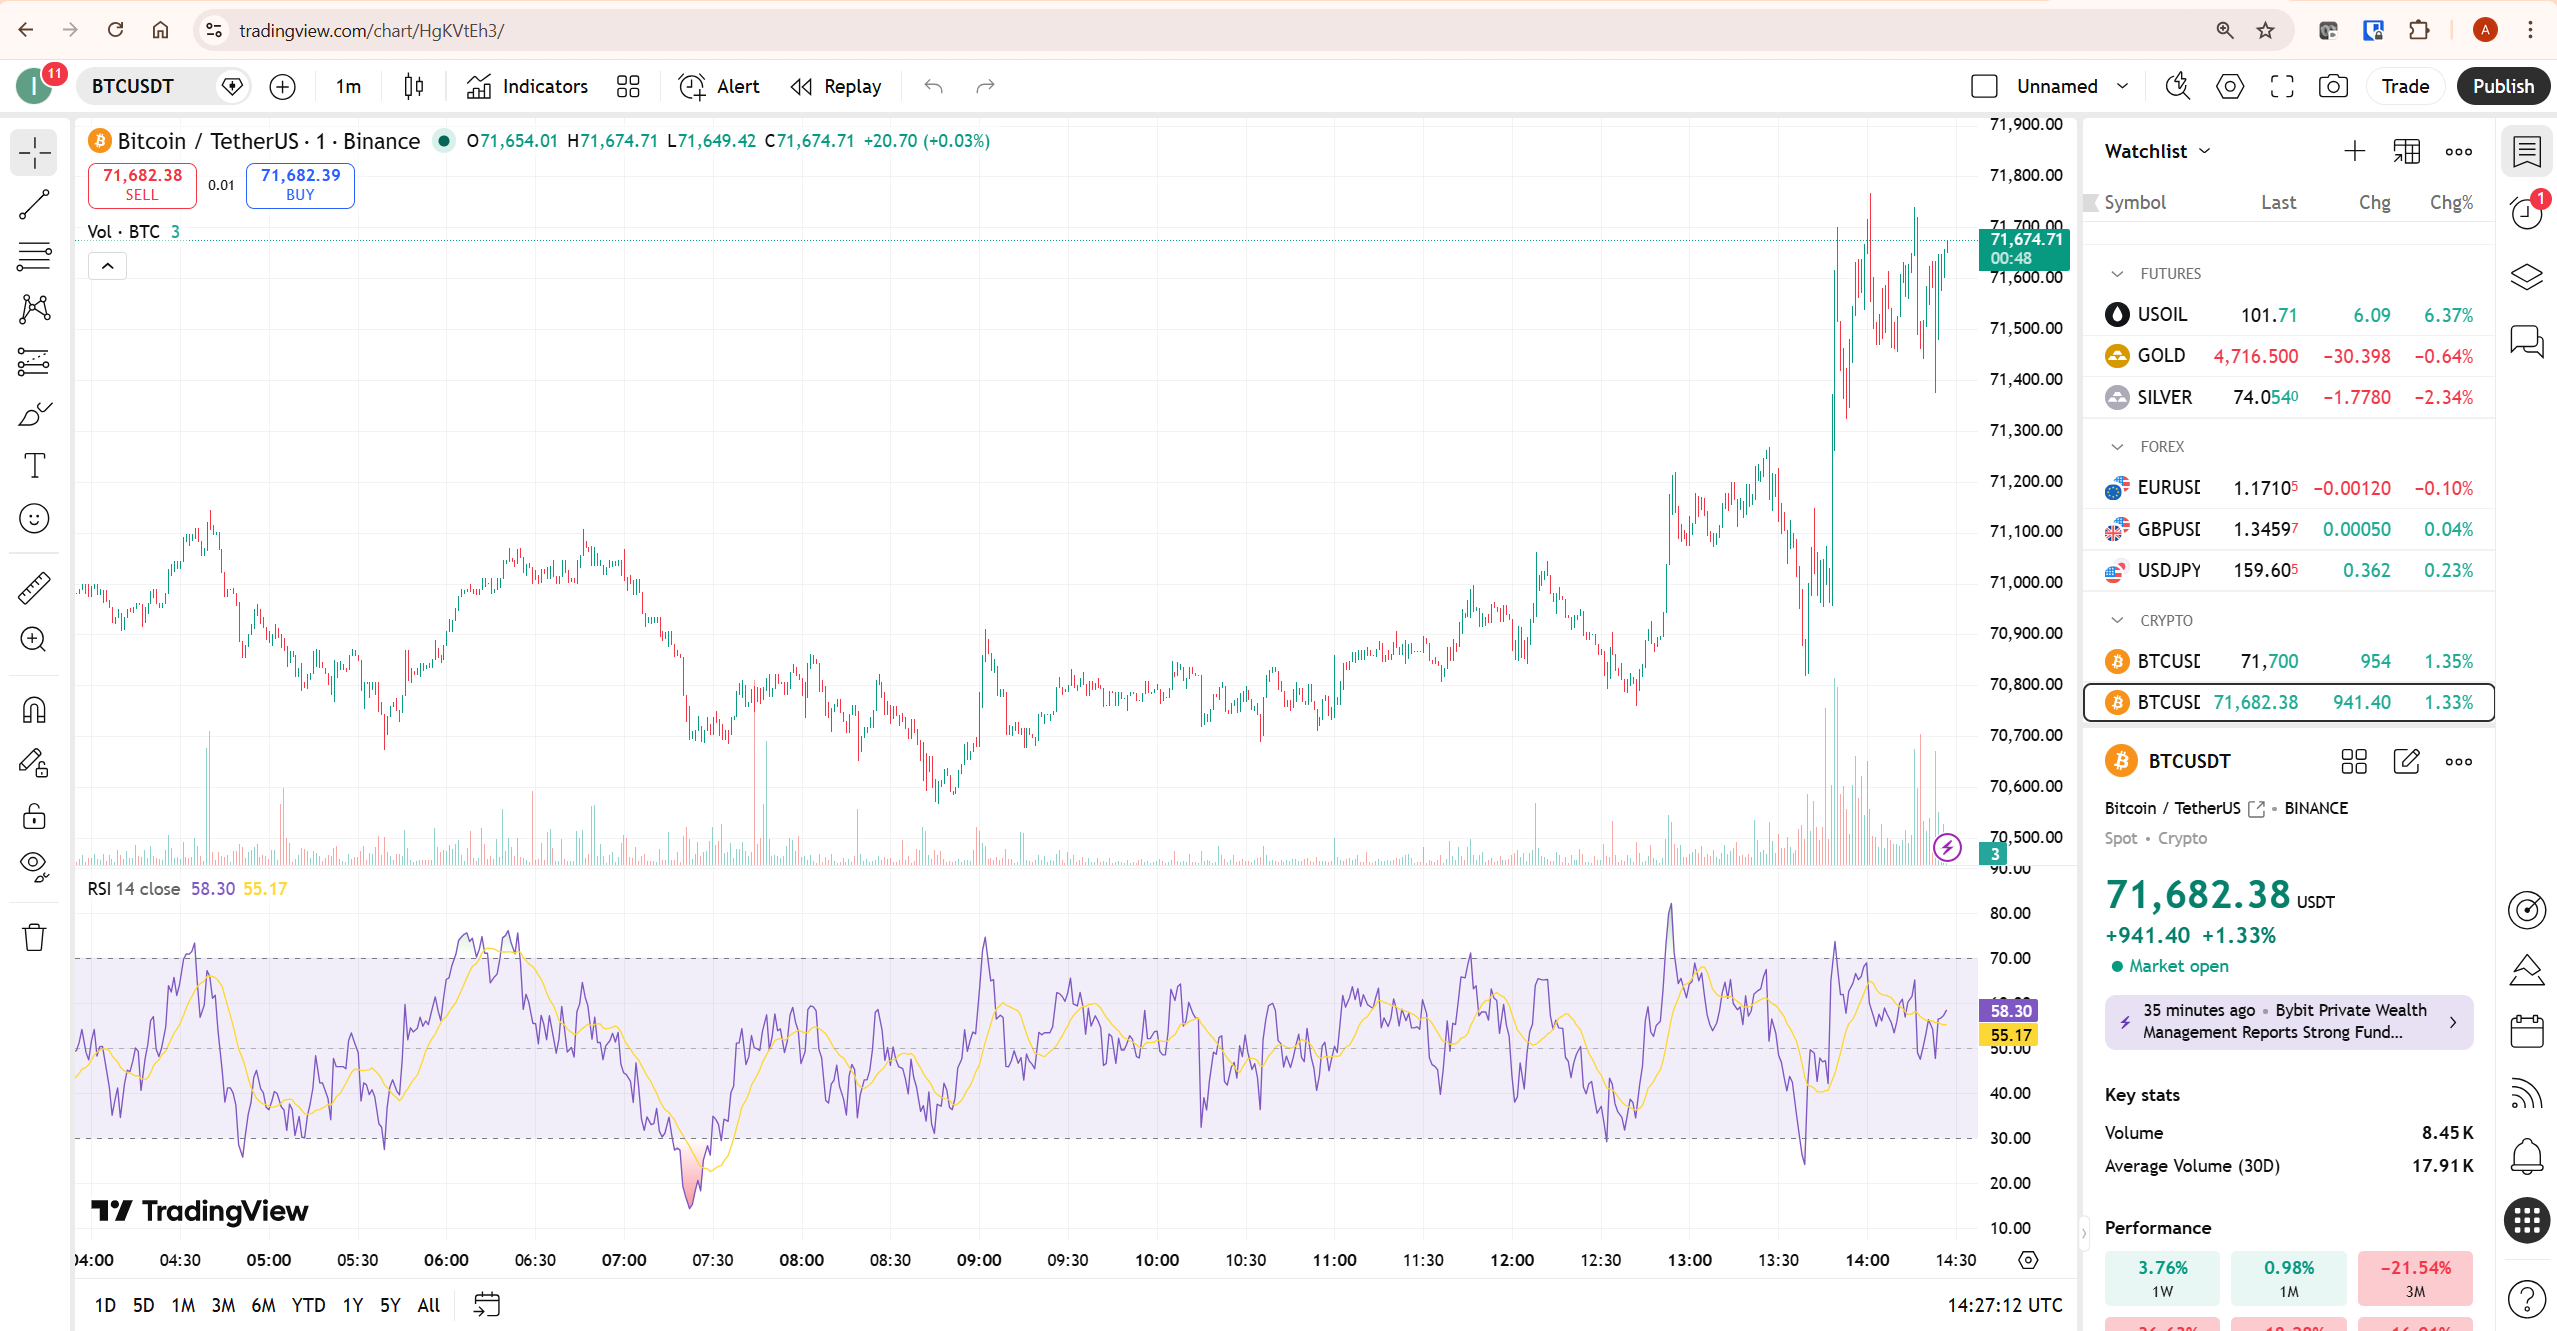
Clicking any symbol in the tradingview watchlist immediately opens that instrument’s chart in the main window. You can scan through an entire list of instruments without typing each ticker manually — on a 20-symbol watchlist that saves several minutes per session, compounding into meaningful time over weeks of daily use.
For a full overview of TradingView’s charting capabilities beyond the watchlist, our TradingView review covers the complete platform including indicators, alerts, and broker integrations.
How to Add Symbols to Your TradingView Watchlist
Adding symbols is straightforward — click the + button at the top right of the watchlist panel and the Add Symbol search dialog opens immediately. Type the ticker or name of the instrument you want and TradingView shows results across every exchange that lists it.
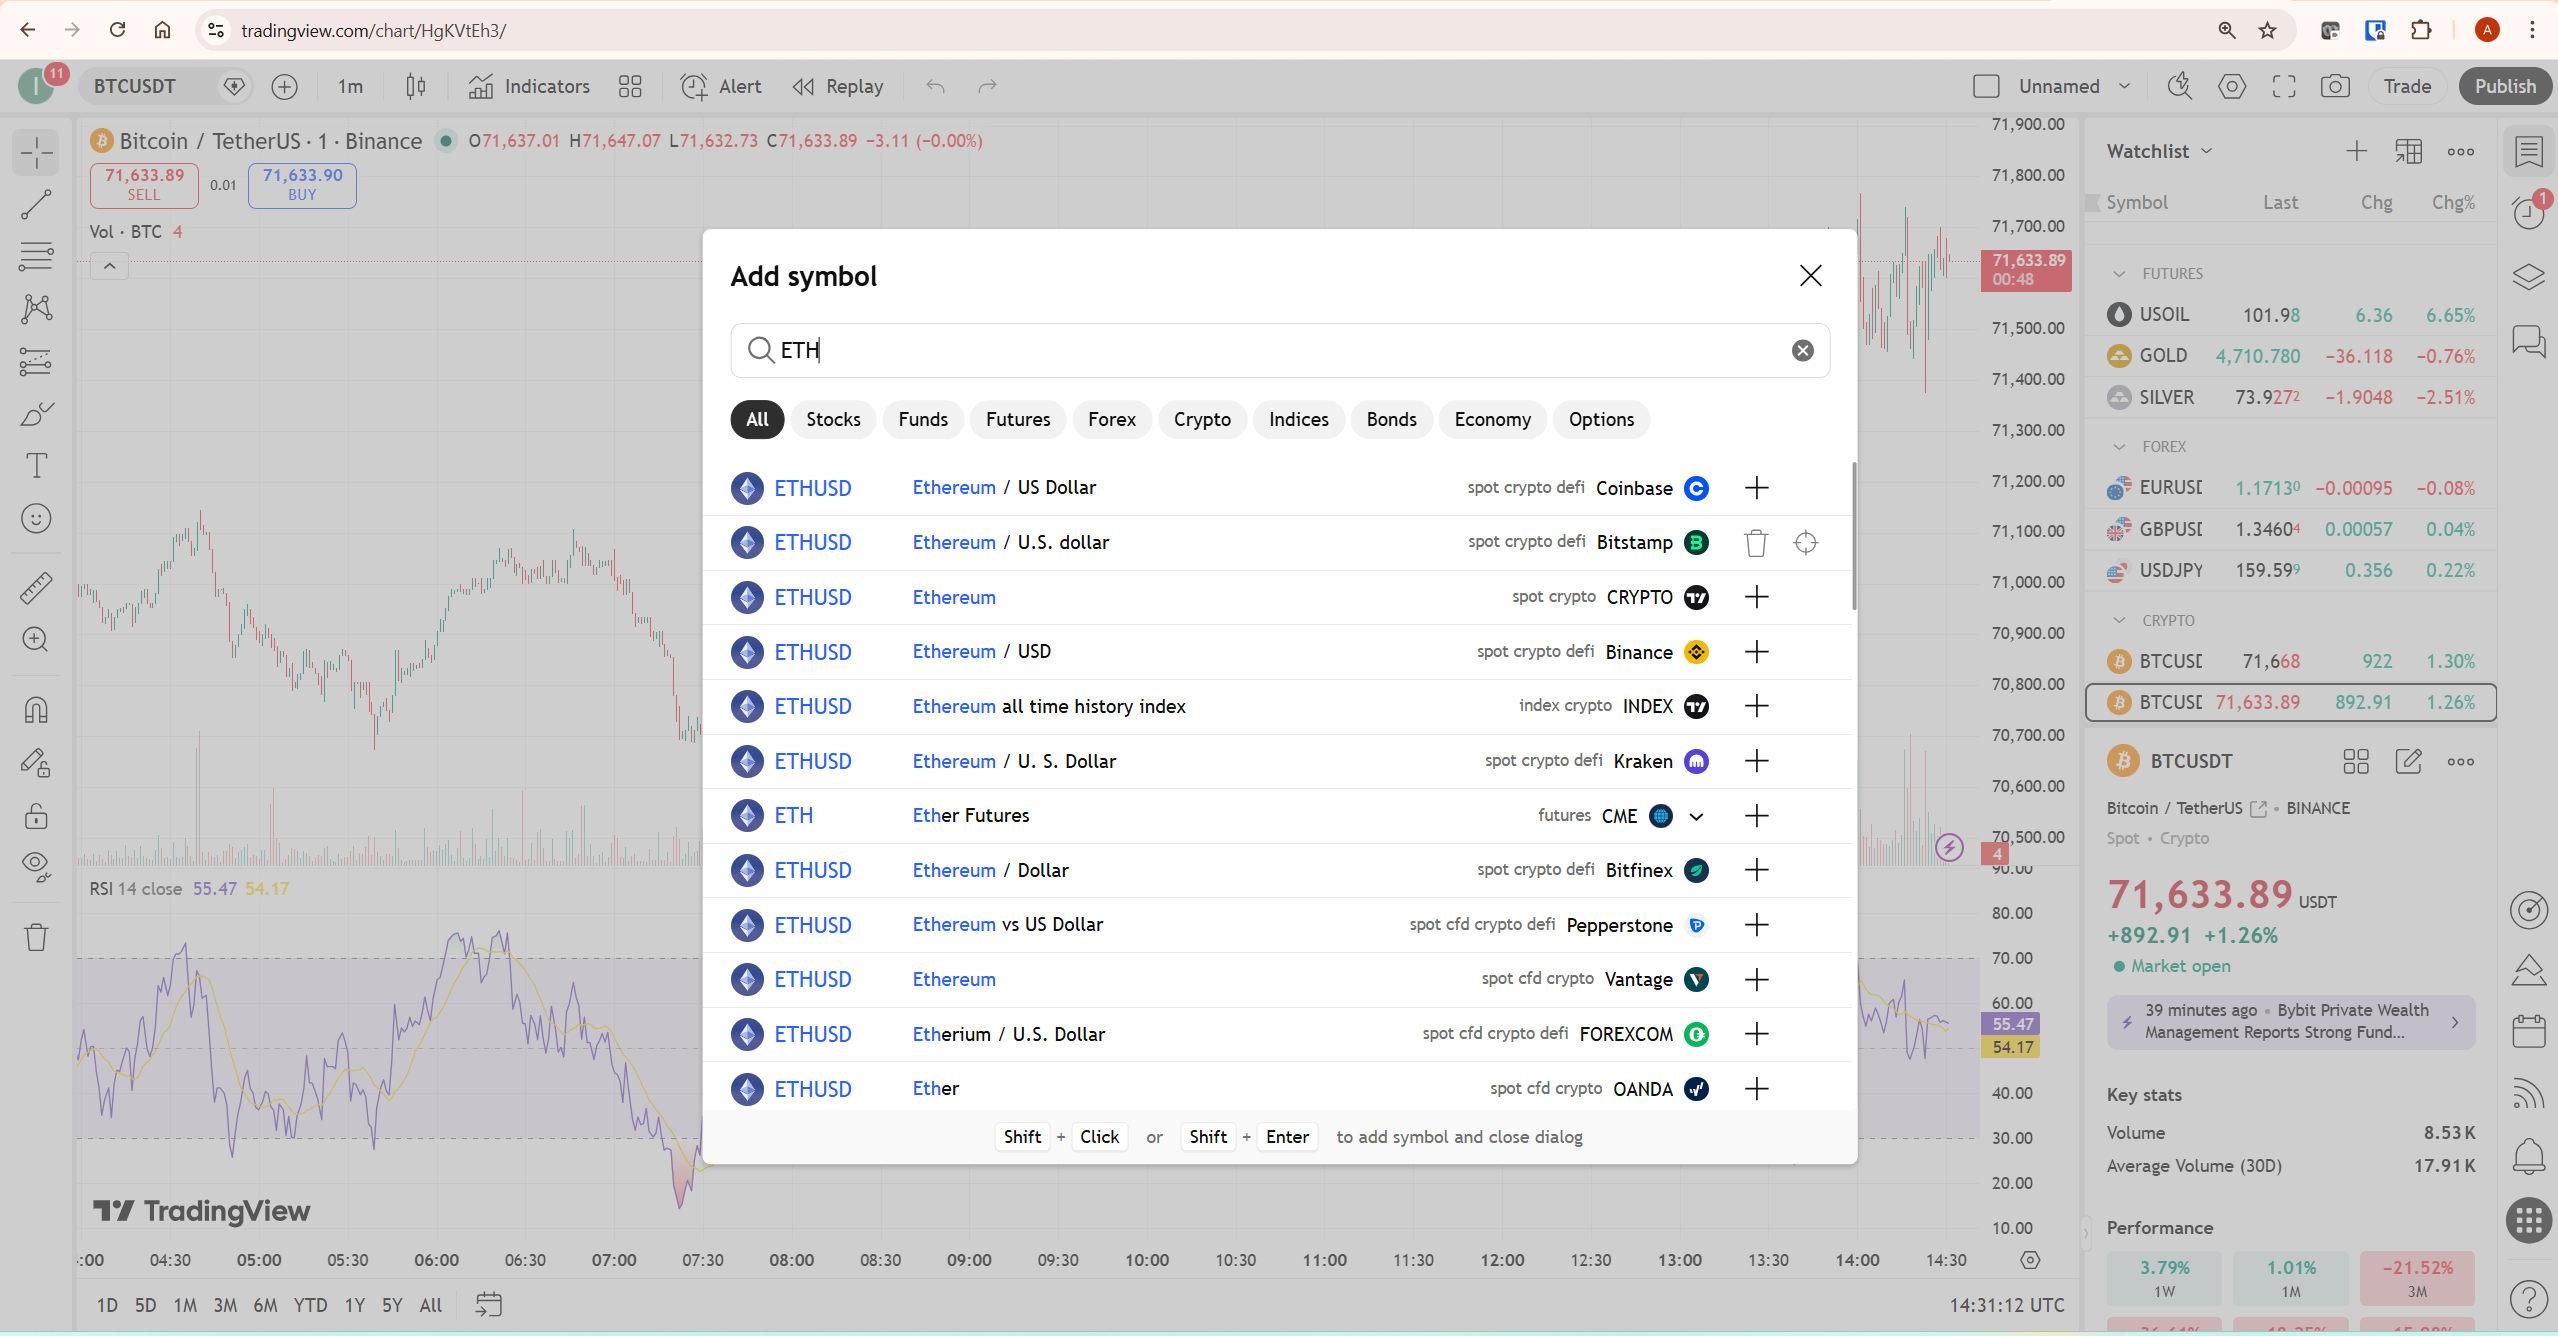
For crypto traders this exchange selection matters significantly. ETHUSD on Coinbase and ETHUSDT on Binance show different prices, different volume data, and different order book dynamics. Choosing the right feed for your watchlist means you are always looking at the market you actually trade, not a proxy for it.
Two keyboard shortcuts worth memorising immediately. Shift + Enter adds the highlighted symbol and closes the dialog in one action. Shift + Click adds a symbol while keeping the search panel open — use this when adding multiple symbols in one session without reopening the dialog each time.
For traders who need to add a large number of symbols at once — an entire sector, an index, or a pre-built screening list — the Upload List option in the watchlist menu accepts a plain text file with one ticker per line. This is substantially faster than adding symbols one by one for lists of more than twenty instruments.
How to Organise Your Watchlist with Sections
Sections are the single most important structural feature of the tradingview watchlist — and the most consistently underused. Without sections, a flat list of symbols past ten instruments becomes a cognitive burden where everything competes for equal attention.
To add a section, click the watchlist name dropdown and select Add section. A new section header appears in your list. Name it clearly and drag symbols into it. Sections collapse and expand by clicking the header — collapsing sections you are not actively monitoring reduces visual noise significantly during a trading session.
A crypto trader might use sections like High Priority, Watching, and DeFi. A stock trader might organise by sector — Technology, Energy, Financials — or by strategy — Breakout Candidates, Earnings Plays, Long-Term Holdings. The naming convention matters less than the logic behind it. What matters is that every symbol has a clear reason for being in its section, and that reason is visible at a glance.
The practical rule: no more than three to five sections per watchlist, and no more than ten to fifteen symbols per section. If a section grows beyond that, it needs to be split or pruned. The goal is a tradingview watchlist you can review completely in under five minutes at the start of each trading session.
How to Create Multiple Watchlists
Multiple watchlists let you separate fundamentally different monitoring purposes — active trading candidates, longer-term positions, macro context instruments — without forcing them into an artificial section structure within a single list.
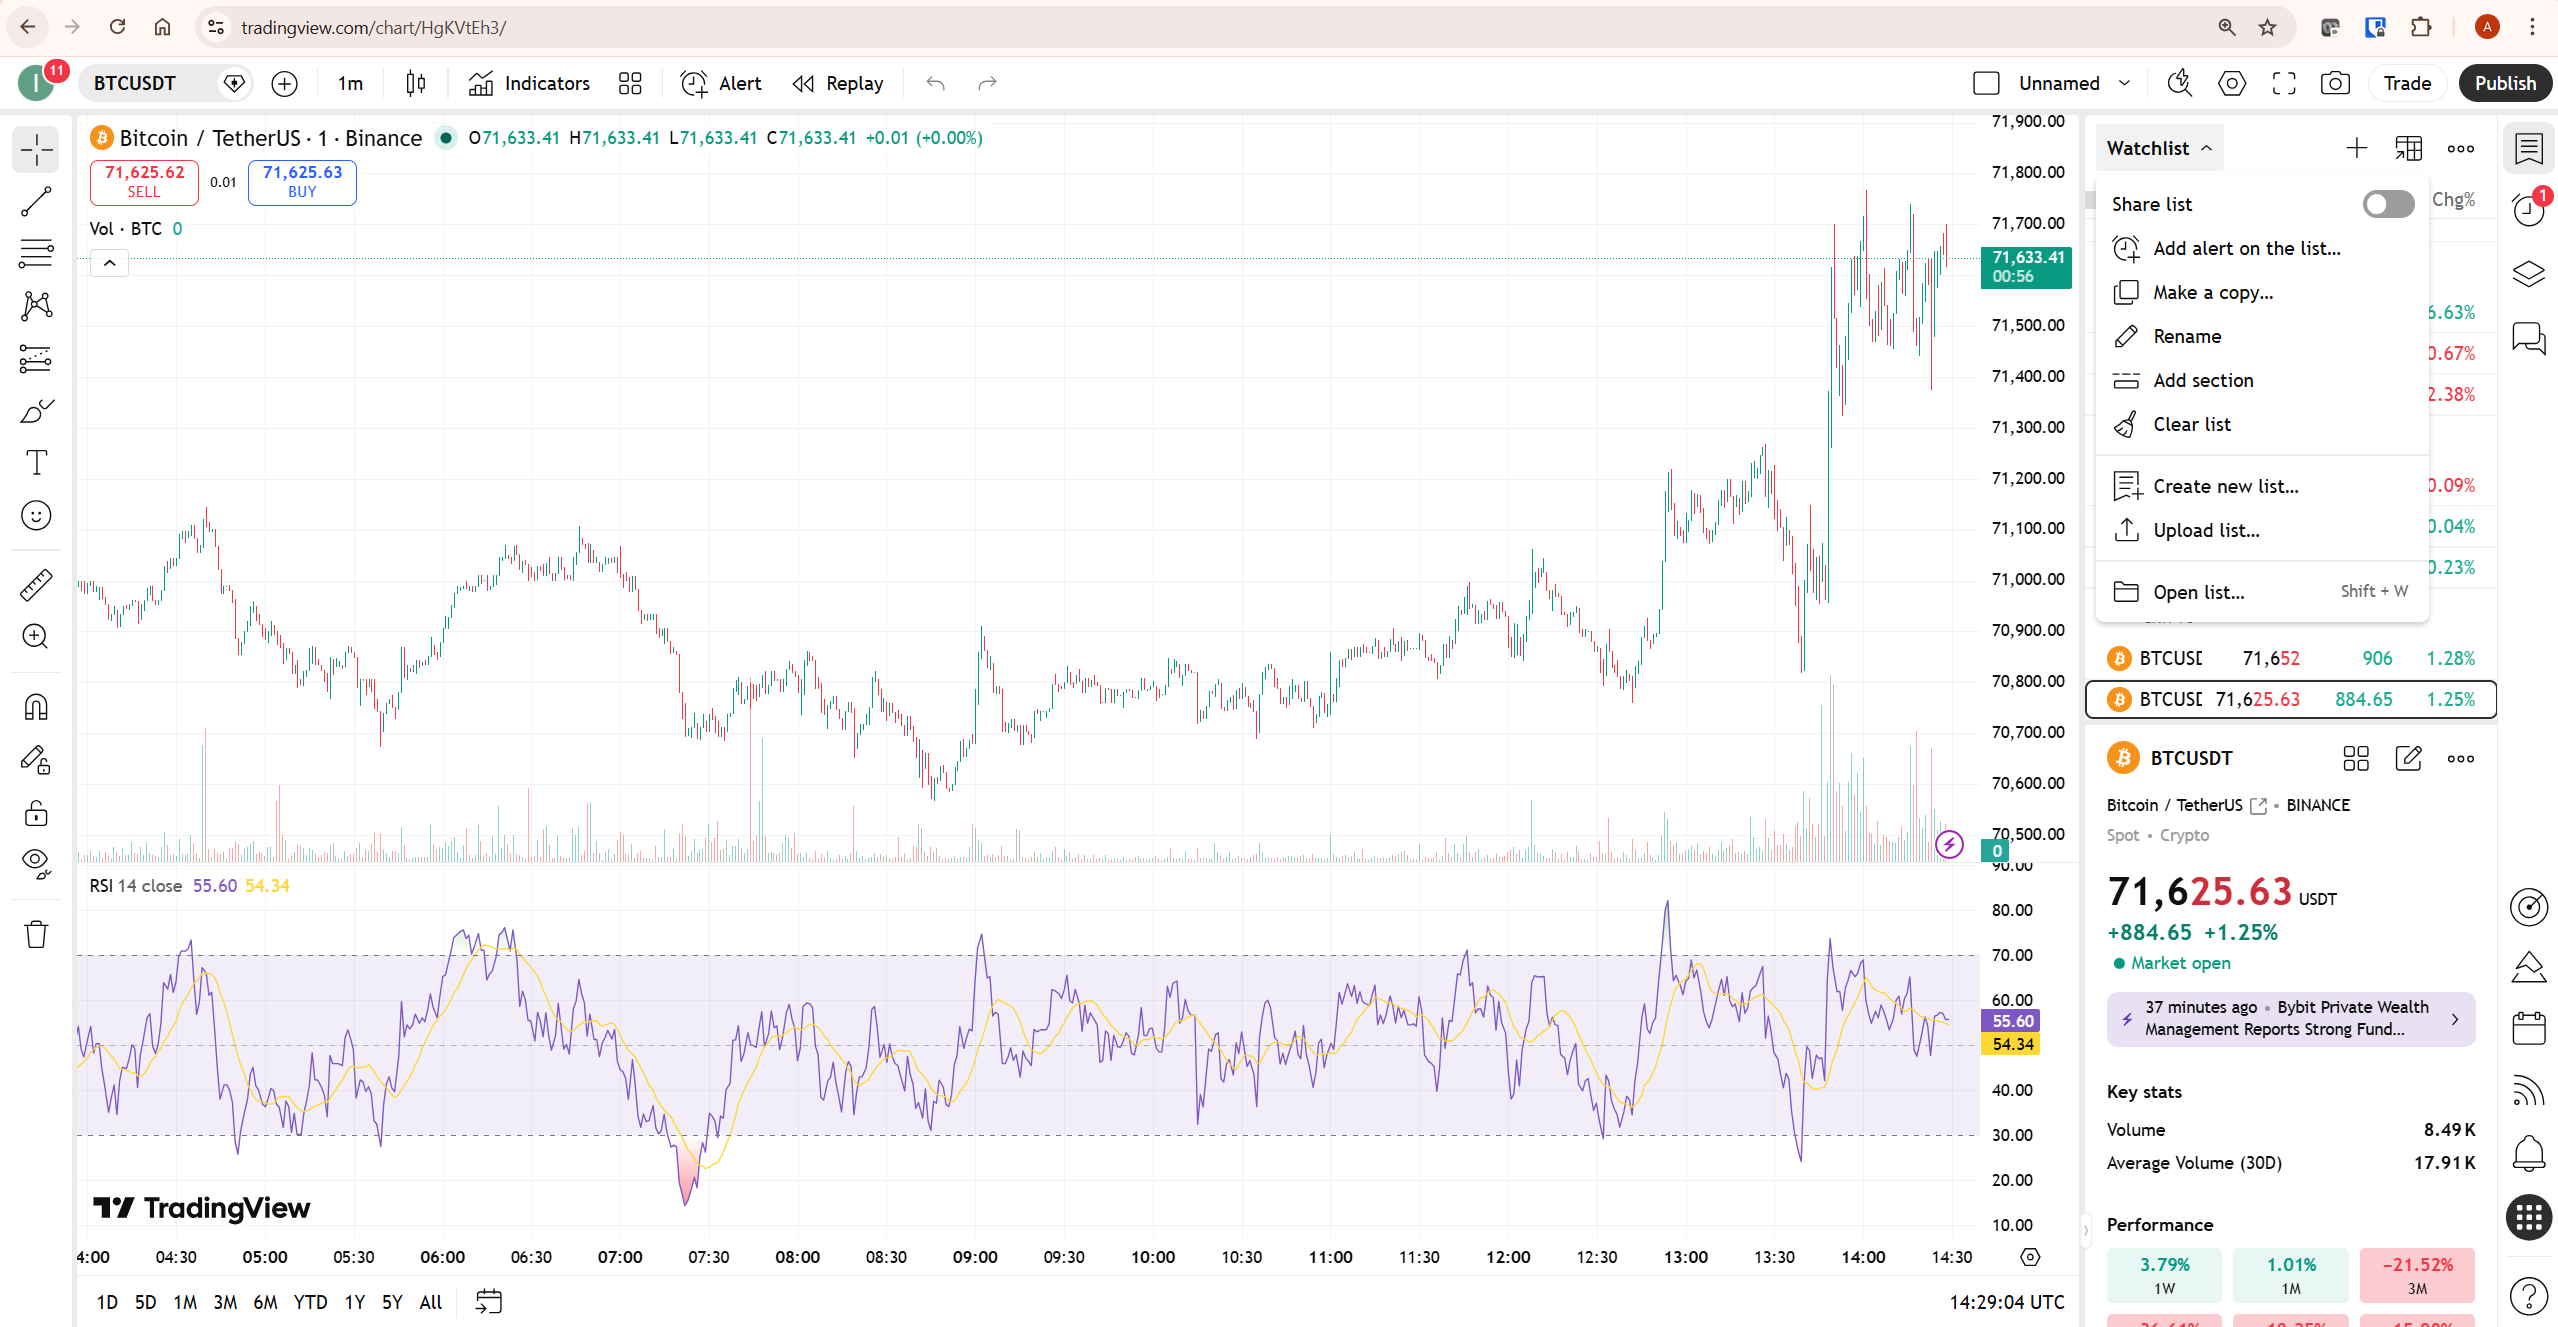
Click the dropdown arrow next to the watchlist name to access all management options. From here you can create a new list, open an existing saved list, upload a list from a file, make a copy, rename, add a section, clear all symbols, or add a watchlist-level alert. The keyboard shortcut Shift + W opens the list browser directly — worth memorising if you switch between multiple watchlists regularly.
On the free plan you are limited to one tradingview watchlist with 30 symbols. This is the most significant watchlist restriction on the free tier — if you trade across multiple asset classes or markets, one list with 30 symbols genuinely constrains how you work. Essential and Plus plans unlock multiple lists. Ultimate allows unlimited watchlists with up to 1,000 symbols each. Our TradingView free vs paid guide breaks down exactly what each plan unlocks across the entire platform.
Using Colour Coding to Prioritise Symbols
Colour coding turns a passive list into an active prioritisation system — and it takes thirty seconds to set up. Right-click any symbol in your tradingview watchlist and a colour palette appears. Assign whatever colour system makes sense for your workflow.
A practical system used by many active traders: green for setups ready to act on today, yellow for symbols approaching a key level but not yet at entry, red for instruments worth monitoring but with no current setup, and no colour for everything else. When you open TradingView each morning, green symbols get reviewed first. Yellow symbols get a quick check. Everything else is background monitoring.
This colour system compounds in value over time. After a few weeks of consistent use, your watchlist becomes a live record of your assessment of each market — a visual summary of where your attention belongs today, updated each session. Traders who use colour coding consistently report spending significantly less time deciding what to look at and more time actually analysing their best setups.
Connecting Your TradingView Watchlist to Alerts
Watchlist-level alerts let you monitor every symbol in a list simultaneously with a single alert condition — one of the most time-efficient features TradingView offers active traders. From the watchlist dropdown menu, select Add alert on the list to create this type of alert.
This is particularly powerful for sector monitoring. If you have a watchlist of ten technology stocks and you want to be notified when any of them crosses above their 50-day moving average, a watchlist alert handles all ten simultaneously rather than requiring ten individual alert setups. According to Investopedia’s technical analysis overview, consistent use of alerts is one of the defining differences between systematic and reactive trading approaches.
Watchlist alerts are available on Premium and Ultimate plans. On Essential and Plus, individual symbol alerts are available but the watchlist-level alert feature is restricted. For a full breakdown of TradingView’s alert capabilities including webhook setup and second-based alerts, our TradingView alerts guide covers every alert type in detail.
Connecting Your Watchlist to the TradingView Screener
The screener and tradingview watchlist work together as a discovery-to-monitoring pipeline — one of the most underused workflow combinations on the platform. In the TradingView screener, find the Watchlist filter in the upper toolbar and select your watchlist. The screener will then apply your filters only to the symbols in that list rather than the full market universe.
The practical workflow this enables: use the screener to discover new candidates that meet your technical criteria, add them to a Monitoring watchlist, review those candidates daily until one meets your full entry setup, then move it to your Active watchlist with a green colour flag. This creates a systematic pipeline from market discovery to trade execution that removes the guesswork of deciding what to look at each session.
For the complete guide to building screener filters and running technical scans, our TradingView screener guide covers the full workflow including crypto screening and saving custom filter sets.
Common Watchlist Mistakes to Avoid
The most common mistake is adding too many symbols. A tradingview watchlist with 200 instruments is not more useful than one with 30 — it is actively less useful, because the cognitive load of reviewing it creates decision paralysis. The best watchlists are deliberately small. If you find yourself never reaching the bottom of your list in a session, it is too long.
The second mistake is never pruning. A watchlist that was well-structured six months ago is probably cluttered now — setups have resolved, instruments stopped being relevant, new markets emerged. Set a monthly reminder to remove any symbol you have not actively used in the past three weeks. If you cannot remember why a symbol is on the list, it should not be there.
The third mistake is using the watchlist as a research archive. Some traders add symbols they find interesting with the intention of studying them later. This gradually converts a workflow tool into a storage bin. If something needs research before it belongs on an active watchlist, put it in a separate Research list and keep your primary list clean.
The fourth mistake is ignoring the screener integration. Many traders build their tradingview watchlist entirely manually, adding symbols one by one based on news or tips. Using the screener to populate watchlists with instruments that meet specific technical criteria is a more systematic and repeatable approach — and it surfaces opportunities that manual browsing alone would miss.
The Recommended Watchlist Structure for Active Traders
After 30 years of watching how professional and retail traders use market monitoring tools, the most effective tradingview watchlist structure for active traders is three lists, not one. This is not arbitrary — each list serves a genuinely different cognitive function that breaks down when combined.
List 1 — Active: Your ten to fifteen primary instruments. These are the symbols you chart every single session without exception. For a crypto trader this might be BTC, ETH, SOL, and a handful of high-liquidity altcoins. For a stock trader, a core sector watchlist. Nothing gets added to this list unless it replaces something already there. This list should not change more than once per month.
List 2 — Monitoring: Symbols that have appeared on your screener scans or come to your attention for a specific reason. These get a daily glance but not full analysis unless they show an active setup. Maximum twenty symbols. Symbols move to the Active list when they develop a setup worth trading, or get removed after three weeks of inactivity.
List 3 — Macro: Indices, currencies, and commodities that provide context for your primary trading decisions without generating trade ideas themselves. For a crypto trader: DXY, SPX, gold, BTC dominance. For a stock trader: sector ETFs, bond yields, VIX. According to StockBrokers.com’s TradingView review, top-down market context is one of the most consistently cited advantages of TradingView’s multi-asset watchlist coverage compared to broker-native platforms.
This three-list structure works because it separates active opportunities from passive monitoring from contextual reference — three genuinely different functions that should not share the same list.
What to Do Next
Open TradingView right now and audit your current tradingview watchlist. Remove every symbol you have not actively used in the past month. Then create two additional lists — one for monitoring and one for macro context. Spend fifteen minutes distributing your remaining symbols across the three lists based on how you actually use them. Add colour coding to your Active list using the green-yellow-red system described above.
That single session will improve your daily workflow more than any new indicator or strategy. If you want to unlock multiple watchlists and watchlist-level alerts, you can start a 30-day free trial of TradingView’s paid plans through our TradingView affiliate link — no commitment required for the first 30 days.
Frequently Asked Questions
How many symbols can I add to a TradingView watchlist?
On the free plan, your tradingview watchlist is limited to one list with 30 symbols. Essential and Plus plans increase this and allow multiple lists. Ultimate allows unlimited watchlists with up to 1,000 symbols per list — designed for traders monitoring broad market universes across multiple asset classes simultaneously. For most active retail traders, the Essential or Plus plan symbol limits are more than sufficient.
Can I have multiple watchlists on TradingView?
Yes — multiple watchlists are available on paid plans. Use the Create new list option from the watchlist dropdown menu. Each list is saved to your account and accessible from any device. The free plan allows only one watchlist, which is the most significant watchlist-related reason to consider upgrading to at least Essential.
How do I add symbols to my TradingView watchlist?
Click the + button at the top of the watchlist panel to open the Add Symbol search dialog. Type the ticker or name, filter by asset type if needed, and click + next to any result to add it. Use Shift + Enter to add and close the dialog in one step, or Shift + Click to add without closing the panel so you can continue adding multiple symbols in sequence.
How do I organise my TradingView watchlist into sections?
Click the watchlist name dropdown and select Add section. A new section header appears in your list — name it descriptively and drag symbols into it. Sections collapse by clicking the header, which is useful for hiding groups you are not actively monitoring during a session. There is no limit to the number of sections you can create within a single tradingview watchlist.
Can I set alerts on my entire TradingView watchlist?
Yes — watchlist-level alerts are available on Premium and Ultimate plans. From the watchlist dropdown menu, select Add alert on the list. This creates a single alert condition that monitors every symbol in the list simultaneously, which is significantly more efficient than creating individual alerts for each symbol. Our TradingView alerts guide covers the full alert setup process.
How do I connect my TradingView watchlist to the screener?
In the TradingView screener, find the Watchlist filter in the upper toolbar and select your watchlist. The screener will then apply your filters only to the symbols in that list rather than the full market. This is the most efficient way to run technical scans against a pre-curated universe of instruments. Our TradingView screener guide explains the complete workflow including how to save screener results directly to a watchlist.
Conclusion
A well-structured tradingview watchlist is not a glamorous trading edge — but it is a real one. It reduces the time spent deciding what to look at, ensures your best setups get reviewed consistently, and creates a repeatable daily workflow that compounds over time. The traders who miss the fewest opportunities are not the ones with the most indicators — they are the ones who review the right instruments every single session.
For active traders managing multiple markets, the three-list structure — Active, Monitoring, Macro — gives you the organisation and focus that a single cluttered list cannot provide. Set it up once, maintain it weekly, and it pays dividends every trading session indefinitely.
For a full breakdown of everything TradingView offers beyond the watchlist, our TradingView review covers the complete platform. To see how your watchlist integrates with TradingView’s screening tools, our TradingView screener guide shows the full discovery workflow. Ready to upgrade your plan and unlock multiple watchlists? Start your free trial at TradingView today.
Trading involves risk. Technical analysis tools do not guarantee profitable results. Past performance is not indicative of future results. Always manage your risk appropriately.