
GetResponse Landing Page Builder: Complete 2026 Guide
Affiliate Disclosure: This article contains affiliate links. If you purchase through these links, I may earn a commission at no extra cost to you. I only recommend tools I have personally used and genuinely believe in. Read my full disclosure policy.
Building a landing page in GetResponse is straightforward — but connecting it properly to your email list, automation sequence, and lead magnet delivery is where most people get stuck. If you have GetResponse and cannot figure out how to make the GetResponse landing page builder actually work for your affiliate site, this guide covers every step from template selection through to the subscription settings that most tutorials skip entirely.
I use the GetResponse landing page builder for InnovateHub Finance — every opt-in page on this site was built inside GetResponse without touching a line of code. After 30 years in finance and building this content business from scratch, what I value most is a tool that connects landing pages directly to email automation without friction. This guide shows you exactly how to do that.
→ Don’t have GetResponse yet? Start free for 30 days — no credit card required
Quick Answer: How Do You Create a Landing Page in GetResponse?
To create a GetResponse landing page: go to Tools → Landing Pages → Create Landing Page → choose “By myself” → select a template → customise in the drag-and-drop editor → click Continue → configure Subscription settings to connect your list and automation → publish. The entire process takes under 30 minutes for a first page. The critical step most tutorials miss is the Subscription settings screen — this is where you connect your landing page sign-ups to your email list and autoresponder cycle automatically.
What Is the GetResponse Landing Page Builder?
The GetResponse landing page builder is a no-code drag-and-drop tool built into every GetResponse plan — including the free tier. It lets you create opt-in pages, lead magnet capture pages, webinar registration pages, and sales pages without needing a separate tool like Leadpages or Unbounce.
What makes the GetResponse landing page builder valuable for affiliate marketers is not the builder itself — it is the integration. When someone submits a form on your GetResponse landing page, they are automatically added to your chosen email list and can be immediately entered into an automation workflow. That complete loop — visitor arrives, opts in, receives lead magnet, enters nurture sequence — happens without any third-party connections or Zapier integrations.
The builder offers two creation paths: a drag-and-drop template editor with over 200 responsive templates, and an AI-powered builder that generates a complete page from a brief description of your offer. Both paths lead to the same editor and the same publishing workflow.
GetResponse Landing Page Plans: What Is Available on Each Tier?
Before building, it is worth knowing exactly what the GetResponse landing page builder includes on your plan — the feature set varies significantly.
| Feature | Free Plan | Starter | Marketer / Creator |
|---|---|---|---|
| Number of landing pages | Unlimited | Unlimited | Unlimited |
| Monthly visitor cap | 1,000 unique visitors | Unlimited | Unlimited |
| A/B testing | Not included | Included | Included |
| Custom domain | GetResponse subdomain only | Custom domain included | Custom domain included |
| AI landing page builder | 3 uses during trial | Included | Included |
| Automation connection | Basic only | Full autoresponder cycle | Full automation workflows |
| Exit-intent popups | Not included | Included | Included |
The free plan’s 1,000 unique visitor cap is the most important limitation to know in advance. Once your landing pages collectively receive 1,000 unique visitors in a month, they go offline until the next month resets. For a new site this is manageable — for any site generating real traffic from search, upgrade before you hit this ceiling.
How to Create a GetResponse Landing Page: Step-by-Step
Step 1: Navigate to Landing Pages
Log into your GetResponse account. Click Tools in the top navigation bar, then click Landing Pages from the dropdown menu. You will land on the Landing Pages management screen showing any existing pages you have created.
Click the Create Landing Page button. GetResponse will ask how you want to build your page — two options appear: By myself (drag-and-drop editor with templates) or Use an AI-powered builder. For full control over your design, choose “By myself.” For a fast first draft you will then customise, the AI builder is a reasonable starting point.
Step 2: Choose a Template
After selecting “By myself,” you see the full template library. GetResponse organises templates by goal: lead generation, sales pages, webinar registration, thank-you pages, and more. For an affiliate content site building a lead magnet funnel, choose from the lead generation category — these templates are pre-optimised with a minimal form, benefit-focused headline structure, and a single call to action.
Key things to look for in a template: a visible opt-in form above the fold, a clear headline area, and a thank-you page included. Most GetResponse landing page templates include a paired thank-you page — use it to deliver your lead magnet download link or confirm the subscription.
Step 3: Customise in the Drag-and-Drop Editor
Once you select a template, the GetResponse landing page editor opens. The canvas shows your page exactly as it will appear to visitors — click any element to edit it directly.
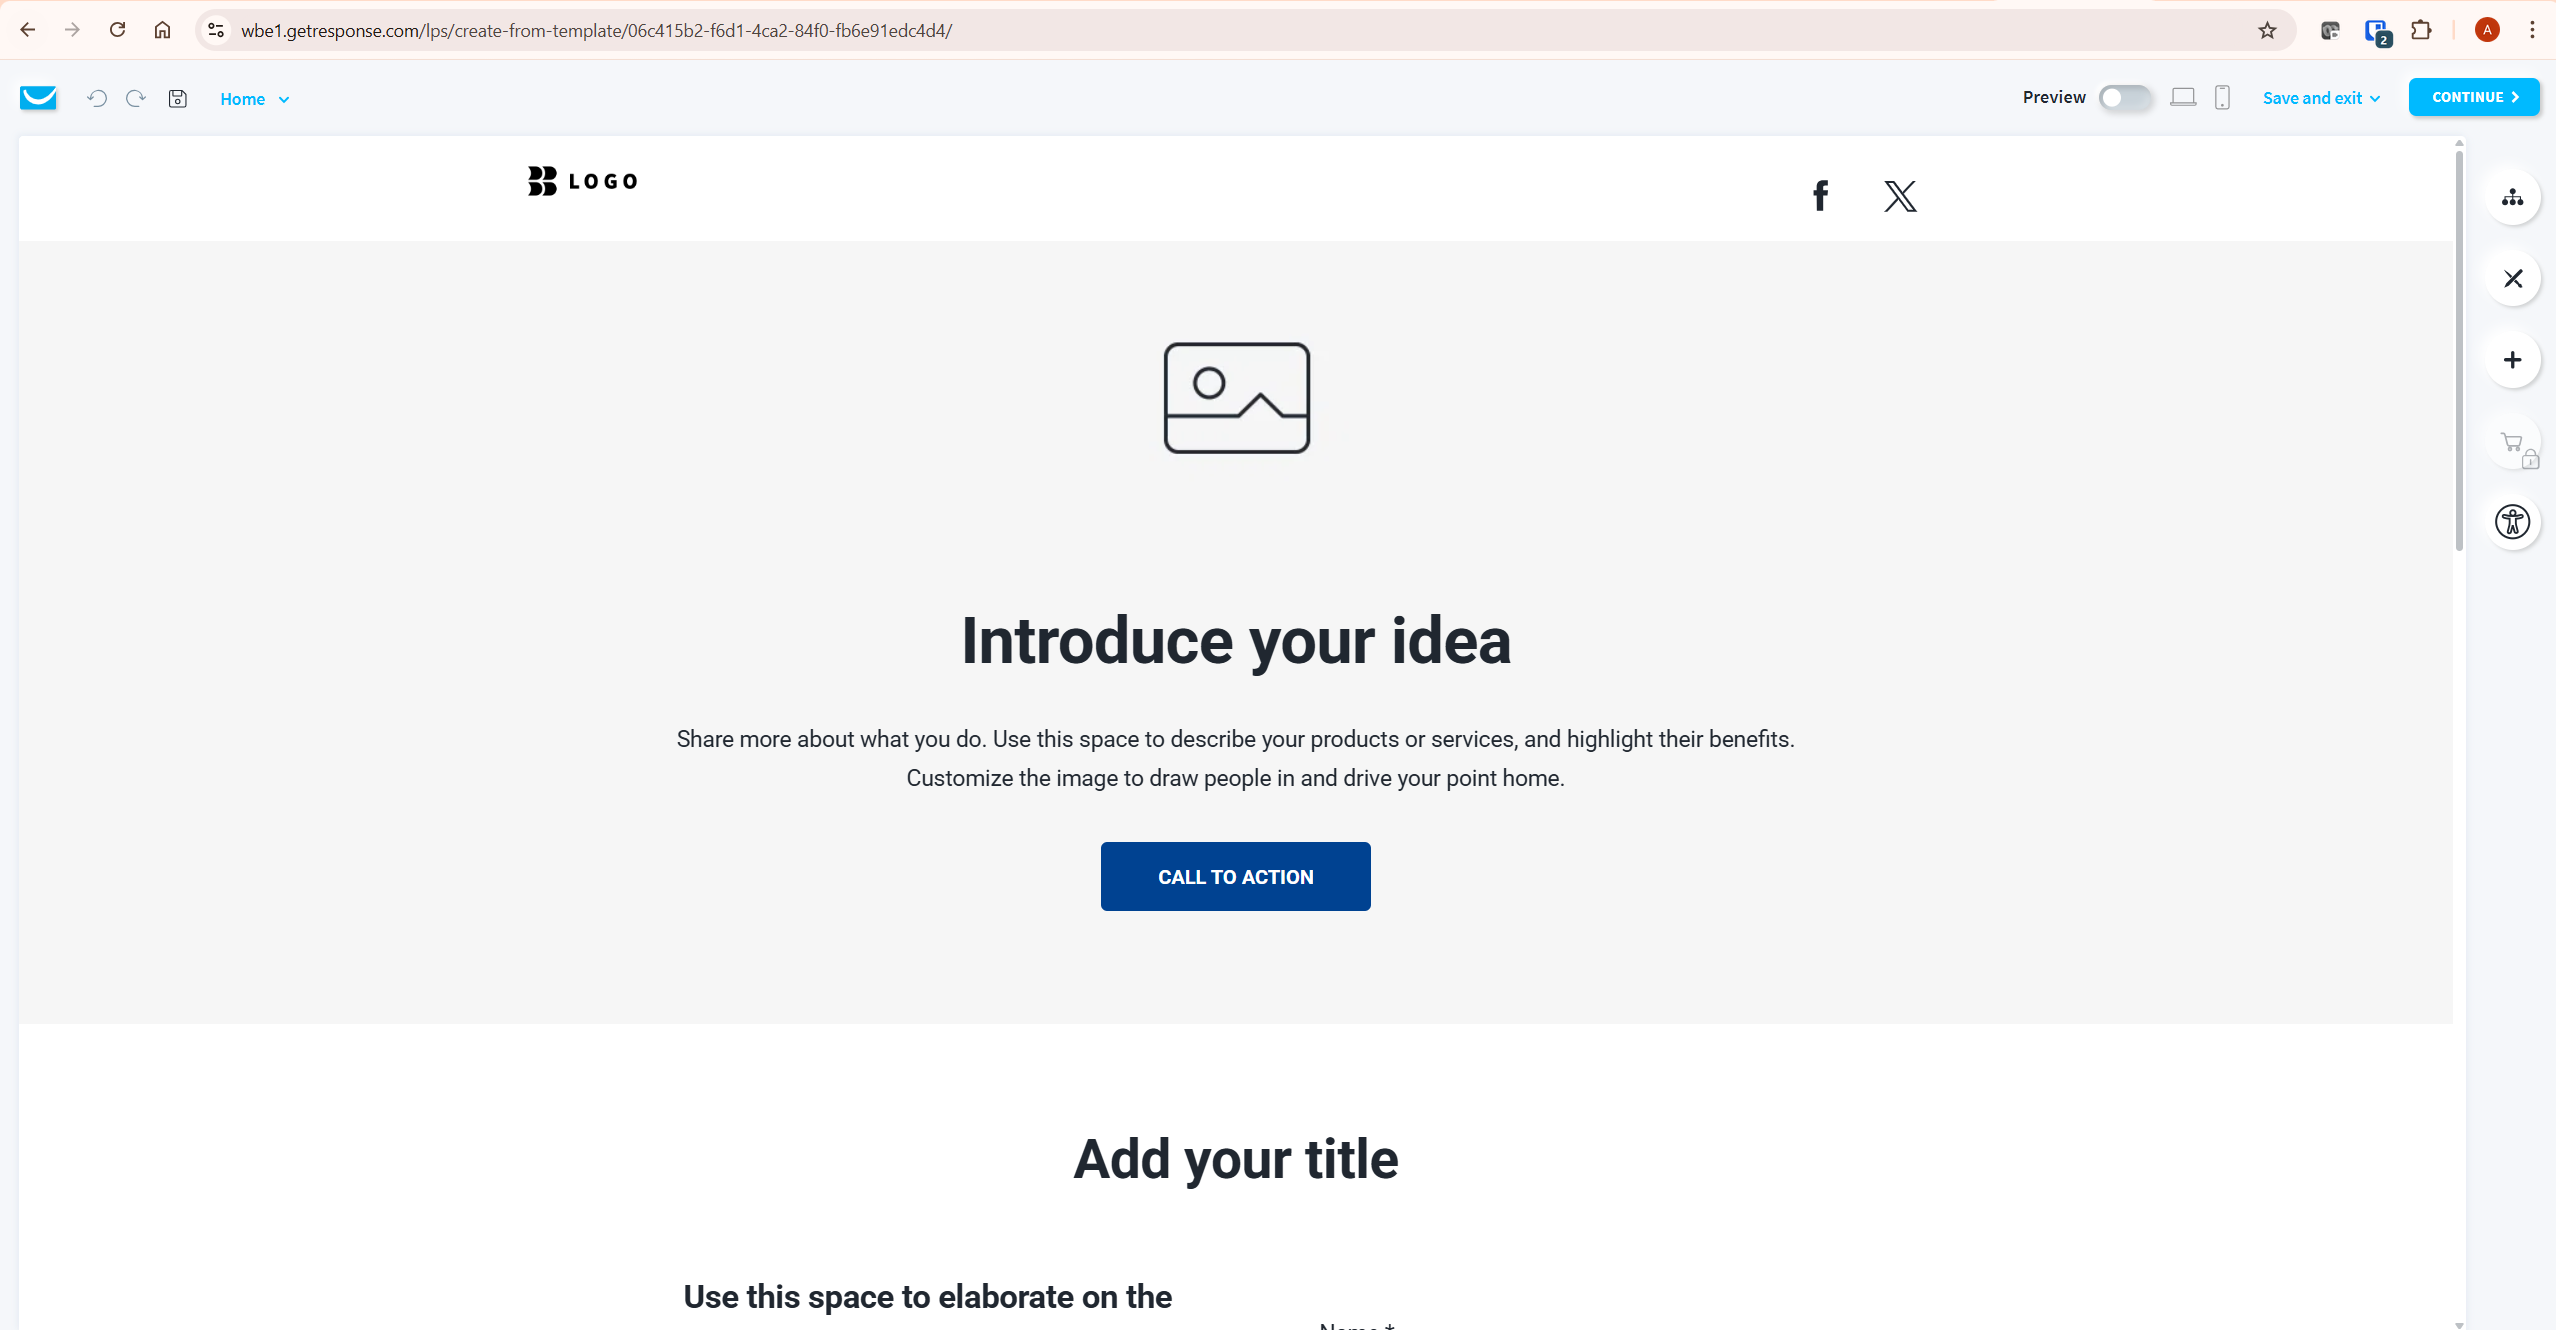
The right-hand toolbar gives you controls to add new sections, duplicate elements, and adjust layouts. Here is what to customise for a high-converting affiliate opt-in page:
- Headline: Lead with the specific outcome your lead magnet delivers. “Download the Free Email Funnel Guide” is weaker than “Get the 7-Step Email Funnel That Delivers Your Lead Magnet Automatically.” Be specific about the result, not just the format.
- Subheadline: Address the reader’s specific pain point in one sentence. “For affiliate marketers who want automated email sequences without technical complexity.”
- Form fields: First name and email only. Every additional field reduces conversion rate. For a lead magnet, name plus email is the maximum.
- CTA button: Replace “Submit” with a benefit-statement button: “Send Me the Guide” or “Get Instant Access.” This single change reliably improves conversions.
- Social proof: Add a line of proof if you have it — “Join 1,200+ affiliate marketers” or a brief testimonial. Even small numbers outperform no proof.
For mobile optimisation: click the mobile preview icon (phone icon in the top toolbar) before finalising. GetResponse landing page templates are responsive by default, but check that your headline does not break awkwardly on mobile and that the form is easy to tap.
Step 4: Configure SEO Settings
Click Continue in the top right when your design is ready. The next screen is the page settings — this covers your page name, URL, SEO meta title and description, and the critical subscription settings.
For SEO settings on a GetResponse landing page: add a meta title containing your target keyword (e.g. “Free Email Funnel Guide for Affiliate Marketers”), a meta description describing the offer, and set the URL to something clean and readable. If you are on a paid plan, you can publish to your own domain — recommended for brand trust and SEO credit.
Step 5: Configure Subscription Settings — The Critical Step
This is the step most GetResponse landing page tutorials skip entirely — and it is the most important one for affiliate marketers.
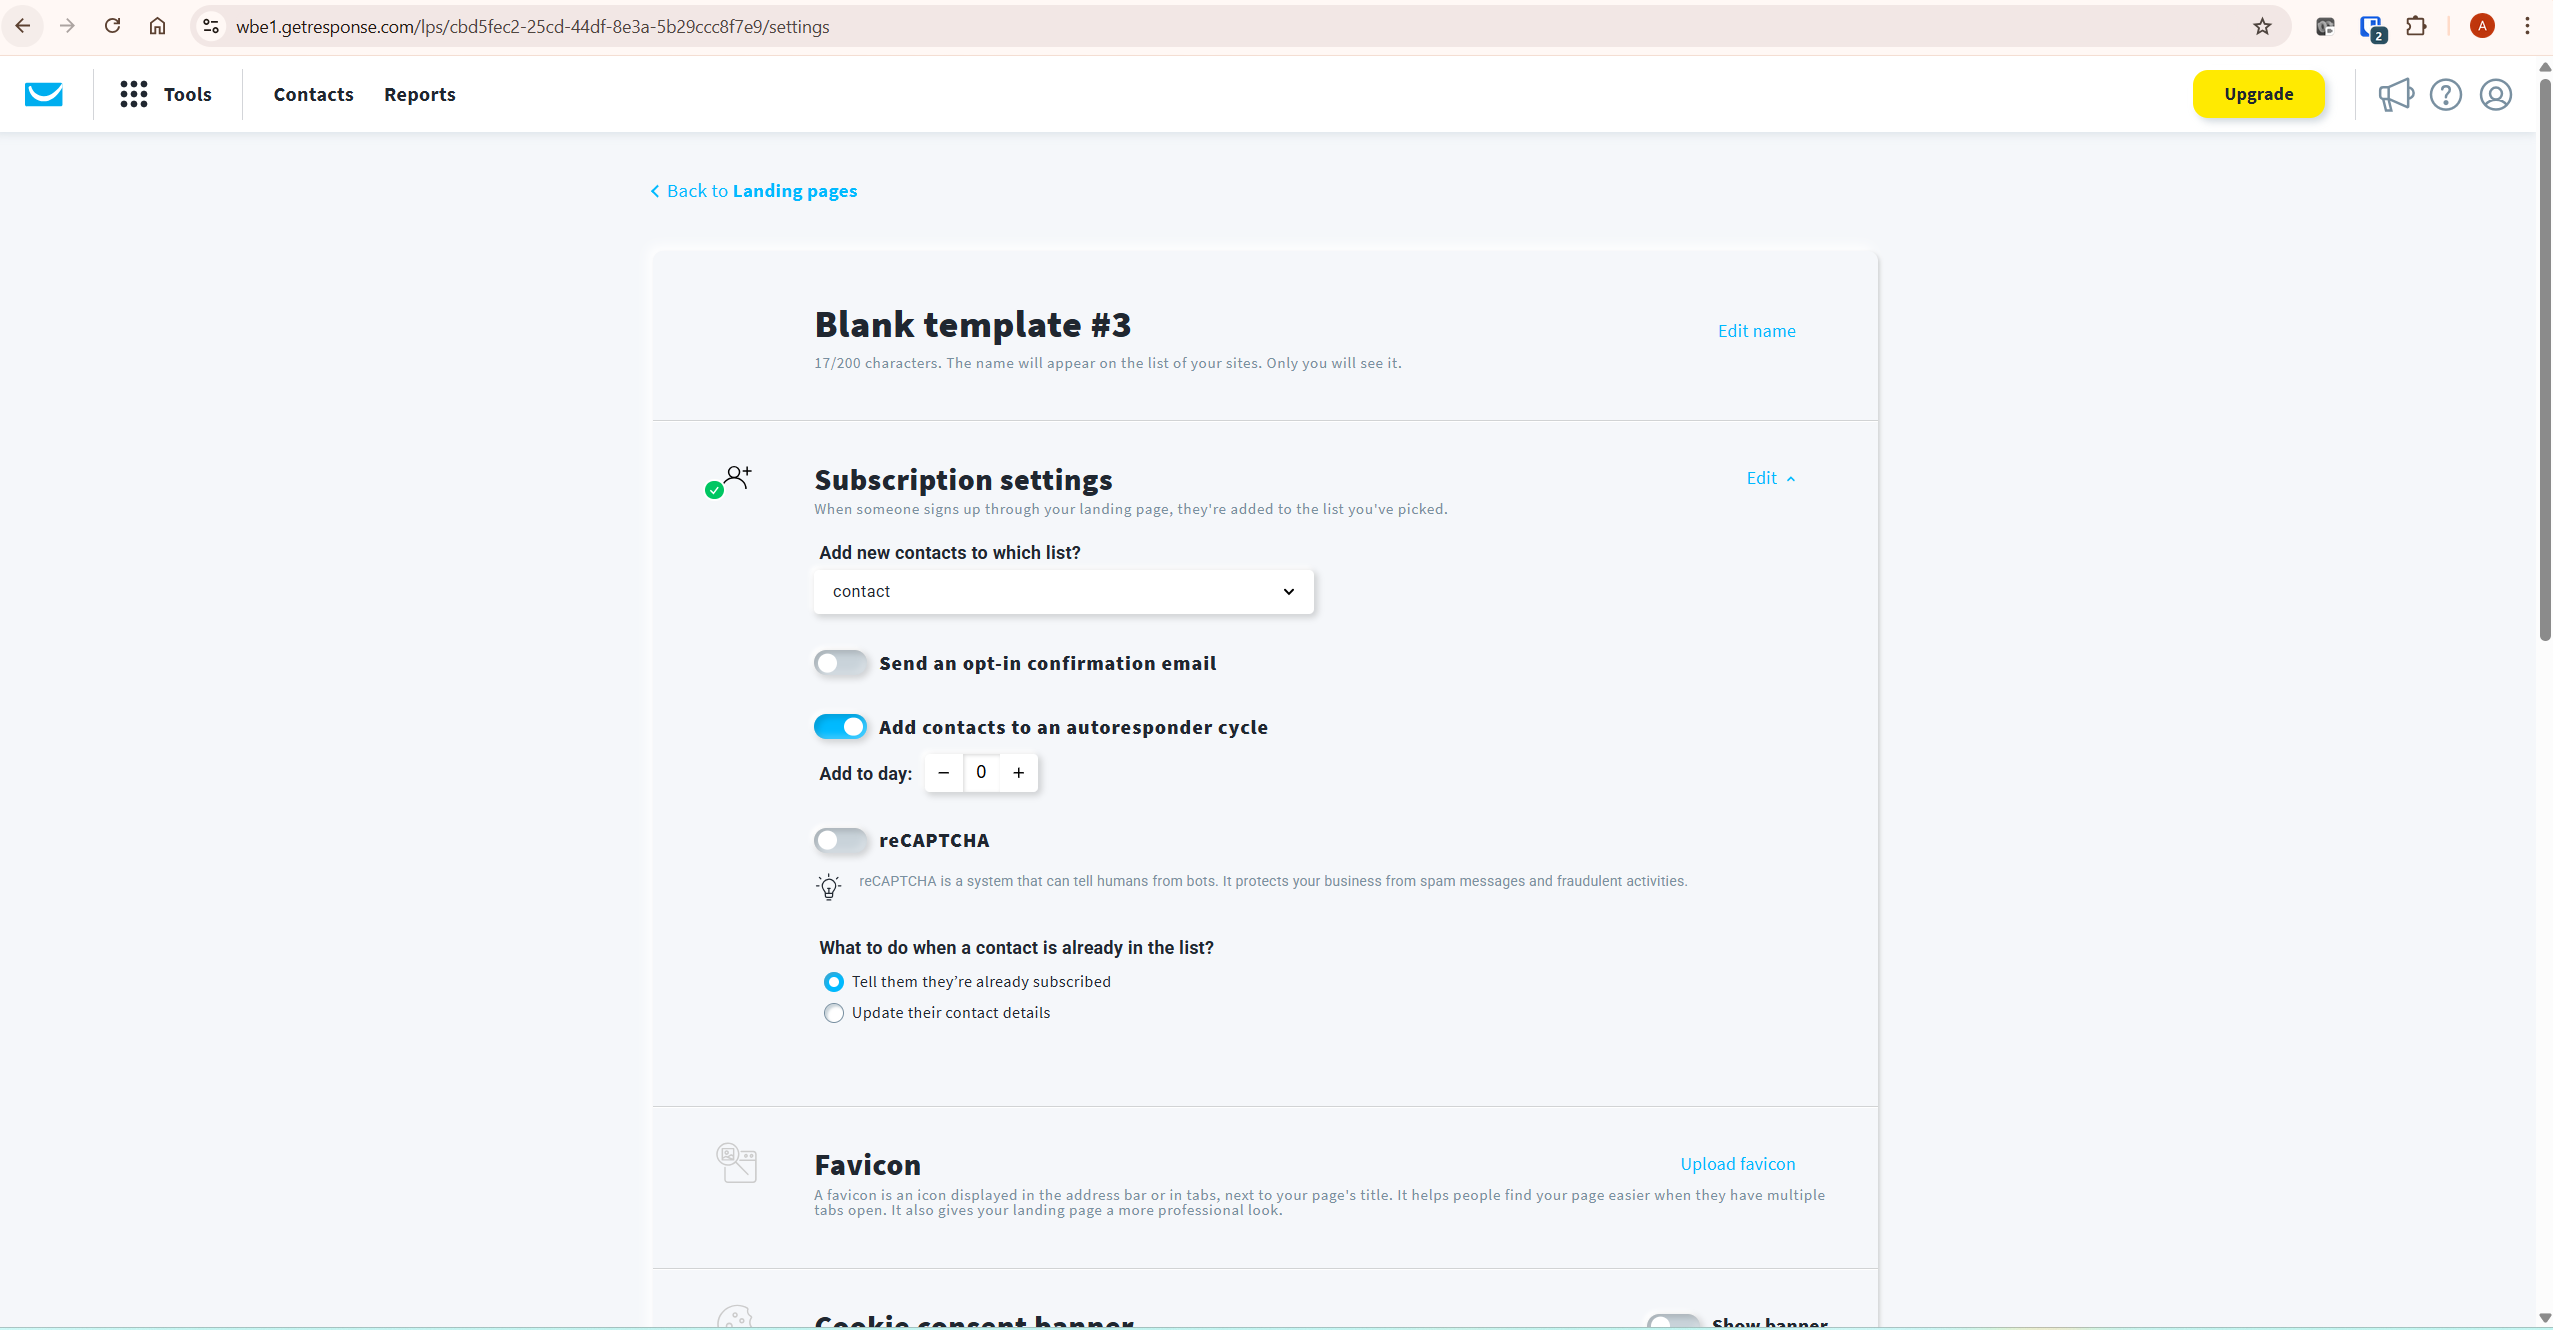
The Subscription settings screen contains four decisions that determine how your GetResponse landing page functions as a lead generation tool:
- Add new contacts to which list: Select your target email list from the dropdown. Every new sign-up through this GetResponse landing page will be added to this list automatically.
- Send an opt-in confirmation email: Toggle this on for double opt-in. Recommended for deliverability and list quality — confirmed subscribers engage more and complain less. Toggle off only if you are running a time-sensitive campaign where friction reduction outweighs list quality.
- Add contacts to an autoresponder cycle: This is the key toggle for affiliate marketers. Enable this and set “Add to day: 0” — this means the moment someone signs up, they immediately enter your autoresponder sequence starting at day zero. Your lead magnet delivery email sends automatically without any manual action.
- reCAPTCHA: Enable this to block bot sign-ups, which inflate your contact count and damage your sender reputation over time.
The autoresponder cycle connection is what transforms a GetResponse landing page from a simple form into a complete lead magnet funnel. Without it, contacts land on your list but receive nothing until you manually send them an email. With it configured correctly, the delivery sequence runs without you.
Step 6: Set Your URL and Publish
Scroll down past Subscription settings to the URL section. On the free plan, your GetResponse landing page publishes to a GetResponse subdomain (yourpage.getresponse.com). On paid plans, you can connect your own domain — go to Account → Domains to add and verify your domain before publishing.
Click Publish. Your GetResponse landing page is now live. Copy the URL and test it — submit your own details to confirm the subscription settings are working correctly and that you receive the autoresponder email as expected.
How to Connect Your GetResponse Landing Page to an Automation Workflow
The autoresponder cycle connection in Step 5 handles simple time-based sequences. For conditional automation — where different subscribers receive different sequences based on their behaviour — you need to connect your GetResponse landing page to a full automation workflow instead.
Here is how to do it:
- Go to Tools → Automation → Create Workflow
- Set the trigger to “Subscribed via” and select your landing page as the subscription source
- Build your sequence — lead magnet delivery email on day 0, follow-up on day 2, product recommendation on day 5
- The workflow activates automatically whenever someone submits the form on your GetResponse landing page
This conditional automation approach is available on the Marketer plan and above. For a detailed walkthrough of building the full automation sequence, see our guide on GetResponse automation for affiliate marketing. And for a complete lead magnet funnel build including landing page, automation, and email sequence, see our GetResponse email funnel guide.
GetResponse Landing Page Templates: How to Choose the Right One
GetResponse includes over 200 landing page templates organised by campaign type. For affiliate marketers the most relevant categories are:
Lead Generation Templates
The best starting point for a lead magnet opt-in page. These templates are designed with a single form, minimal distractions, and a clear value proposition area. Look for templates with the form above the fold — visitors should not need to scroll to find the sign-up form.
Webinar Registration Templates
Use these if you are building a webinar funnel on the Creator plan. GetResponse landing page webinar templates include a countdown timer, speaker bio section, and agenda area — all optimised for registrations rather than general lead capture.
Thank You Page Templates
Every GetResponse landing page should have a paired thank-you page. Use the thank-you page to: deliver the lead magnet download link, set expectations for what emails are coming, and include a soft affiliate recommendation (“While you wait for the guide, here’s the tool I use to…”). This is a frequently missed revenue touchpoint.
GetResponse Landing Page SEO: How to Optimise for Search
A GetResponse landing page can rank in Google search — but only if you treat it like any other page requiring SEO attention. The builder includes meta title, meta description, and URL customisation fields in the settings screen. Here is what to do:
- Meta title: Include your primary keyword naturally — “Free Email Funnel Guide for Affiliate Marketers | InnovateHub Finance”
- Meta description: Describe the offer and the benefit in 155 characters. Include a call to action.
- URL slug: Keep it short and descriptive — /free-email-funnel-guide/ not /landing-page-1/
- Alt text on images: The GetResponse landing page editor lets you add alt text to every image. Use it — it helps both SEO and accessibility.
- Page speed: GetResponse landing pages are hosted on GetResponse’s infrastructure and load fast by default. Do not add excessive images or video embeds that slow load time.
For landing pages where the primary traffic source is paid ads or internal links (rather than organic search), SEO optimisation is less critical. But for evergreen lead magnet pages that you want to rank for long-tail keywords, treat the GetResponse landing page settings with the same care as any WordPress page.
Common GetResponse Landing Page Mistakes to Avoid
Based on direct experience building GetResponse landing pages for InnovateHub Finance, here are the mistakes that cost affiliate marketers the most conversions:
Mistake 1: Not Connecting the Autoresponder Cycle
The most common mistake on a GetResponse landing page. Subscribers opt in, are added to your list, and then receive nothing because the autoresponder cycle toggle was left off. Always verify this setting is enabled and test it yourself before sending traffic.
Mistake 2: Too Many Form Fields
Every field you add beyond first name and email reduces conversion rate. According to Campaign Monitor’s email marketing benchmarks, reducing form fields from three to two consistently improves opt-in rates. On a GetResponse landing page, remove the phone number, company name, or any other optional field unless you have a specific reason to collect it.
Mistake 3: Using the GetResponse Subdomain on a Professional Site
A GetResponse landing page published on a getresponse.com subdomain looks less professional than one on your own domain. Paid plan users should always connect a custom domain — it builds brand trust and ensures the SEO value accrues to your site rather than GetResponse’s domain.
Mistake 4: Ignoring the Thank-You Page
The thank-you page is the highest-intent moment in your funnel — the reader just opted in and is actively engaged. Use it. Deliver the lead magnet download link, introduce yourself, set expectations for the email sequence, and include a single affiliate recommendation. Most GetResponse landing page users leave this page as the default template and lose a significant conversion opportunity.
Mistake 5: Not Testing on Mobile
Over 60% of email opt-ins happen on mobile devices. Always preview your GetResponse landing page on the mobile view before publishing — click the phone icon in the editor toolbar. Check that the headline is readable, the form fields are easy to tap, and the CTA button is large enough to press with a thumb.
GetResponse Landing Page vs Dedicated Landing Page Tools
A common question: should you use the GetResponse landing page builder or a dedicated tool like Leadpages or Unbounce?
For most affiliate content site owners, the GetResponse landing page builder is sufficient. The templates are professional, the editor is intuitive, and — critically — the native integration with GetResponse email lists and automation means there are no third-party connections to configure or break. Leadpages starts at $37/month and Unbounce at $74/month, on top of your email marketing subscription. That is a significant additional cost for capabilities that the GetResponse landing page builder covers for most use cases.
Where dedicated tools have a genuine edge: if you need advanced multivariate testing, highly custom page designs beyond what the GetResponse landing page templates allow, or deep integration with paid ad platforms. For a content site running lead magnet funnels, those requirements rarely apply. According to G2 reviews from GetResponse users, the landing page builder is consistently rated as easy to use and effective for lead generation — the most important criteria for affiliate marketers.
The honest assessment: if you are already paying for GetResponse, use the built-in landing page builder. Buy a dedicated tool only when you have a specific requirement the GetResponse landing page builder demonstrably cannot meet.
Frequently Asked Questions
Is the GetResponse landing page builder free?
Yes. The GetResponse landing page builder is included on all plans including the free tier. The free plan allows unlimited landing pages with a cap of 1,000 unique visitors per month across all pages. A/B testing and custom domain publishing require a paid plan. The 14-day premium trial gives full access to all landing page features including A/B testing before reverting to free plan limits.
How many landing pages can I create in GetResponse?
Unlimited landing pages on all plans including the free tier. The only restriction on the free plan is the 1,000 unique visitor monthly cap across all your pages combined — not per page. On any paid plan (Starter, Marketer, Creator) there is no visitor limit and no page limit.
Can I use my own domain for a GetResponse landing page?
Yes, on any paid plan. On the free plan, landing pages are published to a GetResponse subdomain. On Starter and above, go to Account → Domains → Add Domain to connect your own domain. This is strongly recommended for professional credibility and to ensure SEO value goes to your own domain rather than GetResponse’s.
How do I connect a GetResponse landing page to my email list?
In the landing page settings screen (after clicking Continue in the editor), scroll to Subscription settings. Select your target list from the dropdown, toggle on “Add contacts to an autoresponder cycle,” and set “Add to day: 0.” This ensures every new sign-up is added to your list and immediately enters your email sequence. Test by submitting your own details after publishing.
Does GetResponse have A/B testing for landing pages?
Yes, on paid plans. A/B testing for GetResponse landing pages is not available on the free tier. On Starter and above, you can create multiple variants of a page and split traffic between them to test headlines, form layouts, CTA button text, and images. Access A/B testing from the Landing Pages management screen by clicking the three dots on an existing page.
Can I add a popup to my GetResponse landing page?
Yes. GetResponse landing pages support exit-intent popups and timed popups on paid plans. In the editor, use the popup element from the toolbar. Set triggers such as time on page, scroll depth, or exit intent. Popups can include their own opt-in form connected to a separate list or the same list as the main page form.
What is the difference between a GetResponse landing page and a GetResponse website?
A GetResponse landing page is a single focused page with one conversion goal — typically an opt-in form or a purchase. A GetResponse website is a multi-page site built with the website builder, intended as a full online presence. For affiliate marketers, landing pages are the right tool for lead magnet capture and campaign-specific opt-ins. The website builder is useful only if you do not have an existing site — most affiliate content site owners already have a WordPress site and use GetResponse landing pages for specific campaign pages.
Related GetResponse Articles
- GetResponse Review 2026: The Honest Verdict for Affiliate Marketers
- How to Build an Email Funnel with GetResponse (Step-by-Step Guide)
- GetResponse Automation: 7 Proven Steps for Affiliate Marketing
- GetResponse Free Plan: The Honest 2026 Guide
- GetResponse Pricing in 2026: Plans, Features & What You Actually Pay For
This guide is based on direct use of the GetResponse landing page builder for InnovateHub Finance as of April 2026. Features and interface may change — always verify current details at getresponse.com before making decisions.
