
GetResponse Automation: 7 Proven Steps for Affiliate Marketing
This article contains affiliate links. If you sign up for GetResponse through a link on this page, I may earn a commission at no extra cost to you. I only recommend tools I have genuinely evaluated.
Most affiliate marketers build a list and treat every subscriber identically. The same email goes to the person who downloaded a crypto tax guide and the person who came from a trading indicators article. That approach works at 200 subscribers. It breaks at 2,000. GetResponse automation is what replaces that flat broadcast model with a behavioural system that reacts to what each subscriber actually does.
I am Andreas Maratheftis — 30 years in professional finance, and I use GetResponse automation for the InnovateHub Finance email list across four affiliate product clusters: TradingView, Koinly, GetResponse, and Semrush. Each cluster attracts a different reader with a different problem. GetResponse automation is what makes it possible to serve each group relevantly without running four entirely separate accounts.
This guide covers the complete setup: workflow structure, tagging architecture, conditional branching, lead scoring, and the re-engagement system that keeps your list healthy long-term. GetResponse’s free trial requires no credit card — test the full automation builder before committing.
Quick Answer: How Does GetResponse Automation Work for Affiliate Marketers?
GetResponse automation uses a visual workflow builder where you connect triggers, actions, and conditions to create email sequences that run automatically. For affiliate marketing, the core setup is: subscriber joins your list → source tag applied → lead magnet delivered → value emails sent → conditional branch based on engagement → affiliate recommendation sent only to subscribers who have shown active interest. You need at minimum the Marketer plan for unlimited workflows, full tagging, and lead scoring — the Starter plan restricts you to one workflow with six elements, which is not enough for a serious affiliate operation.
Which Plan Do You Need for GetResponse Automation?
This is the question most guides skip — and it is the one most likely to explain why your automation is not doing what you expected.
| Plan | Workflows | Tags and Scoring | Conditional Branching | Best For |
|---|---|---|---|---|
| Starter | 1 workflow, max 6 elements | No | No | Testing only — not viable for affiliate automation |
| Marketer | Unlimited | Yes | Yes | Affiliate content sites — minimum viable plan |
| Creator | Unlimited plus webinar elements | Yes | Yes | Affiliates who also run webinar funnels |
The Starter plan’s six-element cap means your automation can handle: trigger → tag → send email → wait → send email → end. The moment you add a conditional branch — the element that routes engaged subscribers differently from passive ones — you exceed six elements. Conditional branching is the mechanism that makes GetResponse automation genuinely useful for affiliate marketing. It is not available on the Starter plan.
Tags are the second critical gap on the Starter plan. Without tags, automation cannot record which affiliate product a subscriber clicked, which lead magnet brought them in, or whether they qualify as high-intent. For a detailed cost breakdown across list sizes, read the GetResponse pricing guide. Always verify current plan features at getresponse.com as plan details can change.
Why Your Affiliate Email List Stops Converting Without Automation
When every subscriber gets the same message regardless of behaviour, open rates decay, click rates drop, and unsubscribes accelerate. The problem is not the content — it is the system.
Segmented and automated email campaigns consistently outperform non-segmented broadcasts on every engagement metric, and that performance gap compounds over the lifetime of a list. A subscriber who receives a relevant email three days after showing interest in a specific topic converts at a fundamentally different rate than one who receives the same generic promotion sent to everyone else.
If you have not yet built the basic funnel, start with how to build an email funnel with GetResponse before adding the automation layer — the foundation needs to exist first.
How to Access GetResponse Automation
From your dashboard, click Tools in the top navigation, then select Automation. You land on the automation workflows dashboard — a list of every active, draft, and paused sequence in your account, with per-workflow statistics showing how many contacts are currently moving through each one.
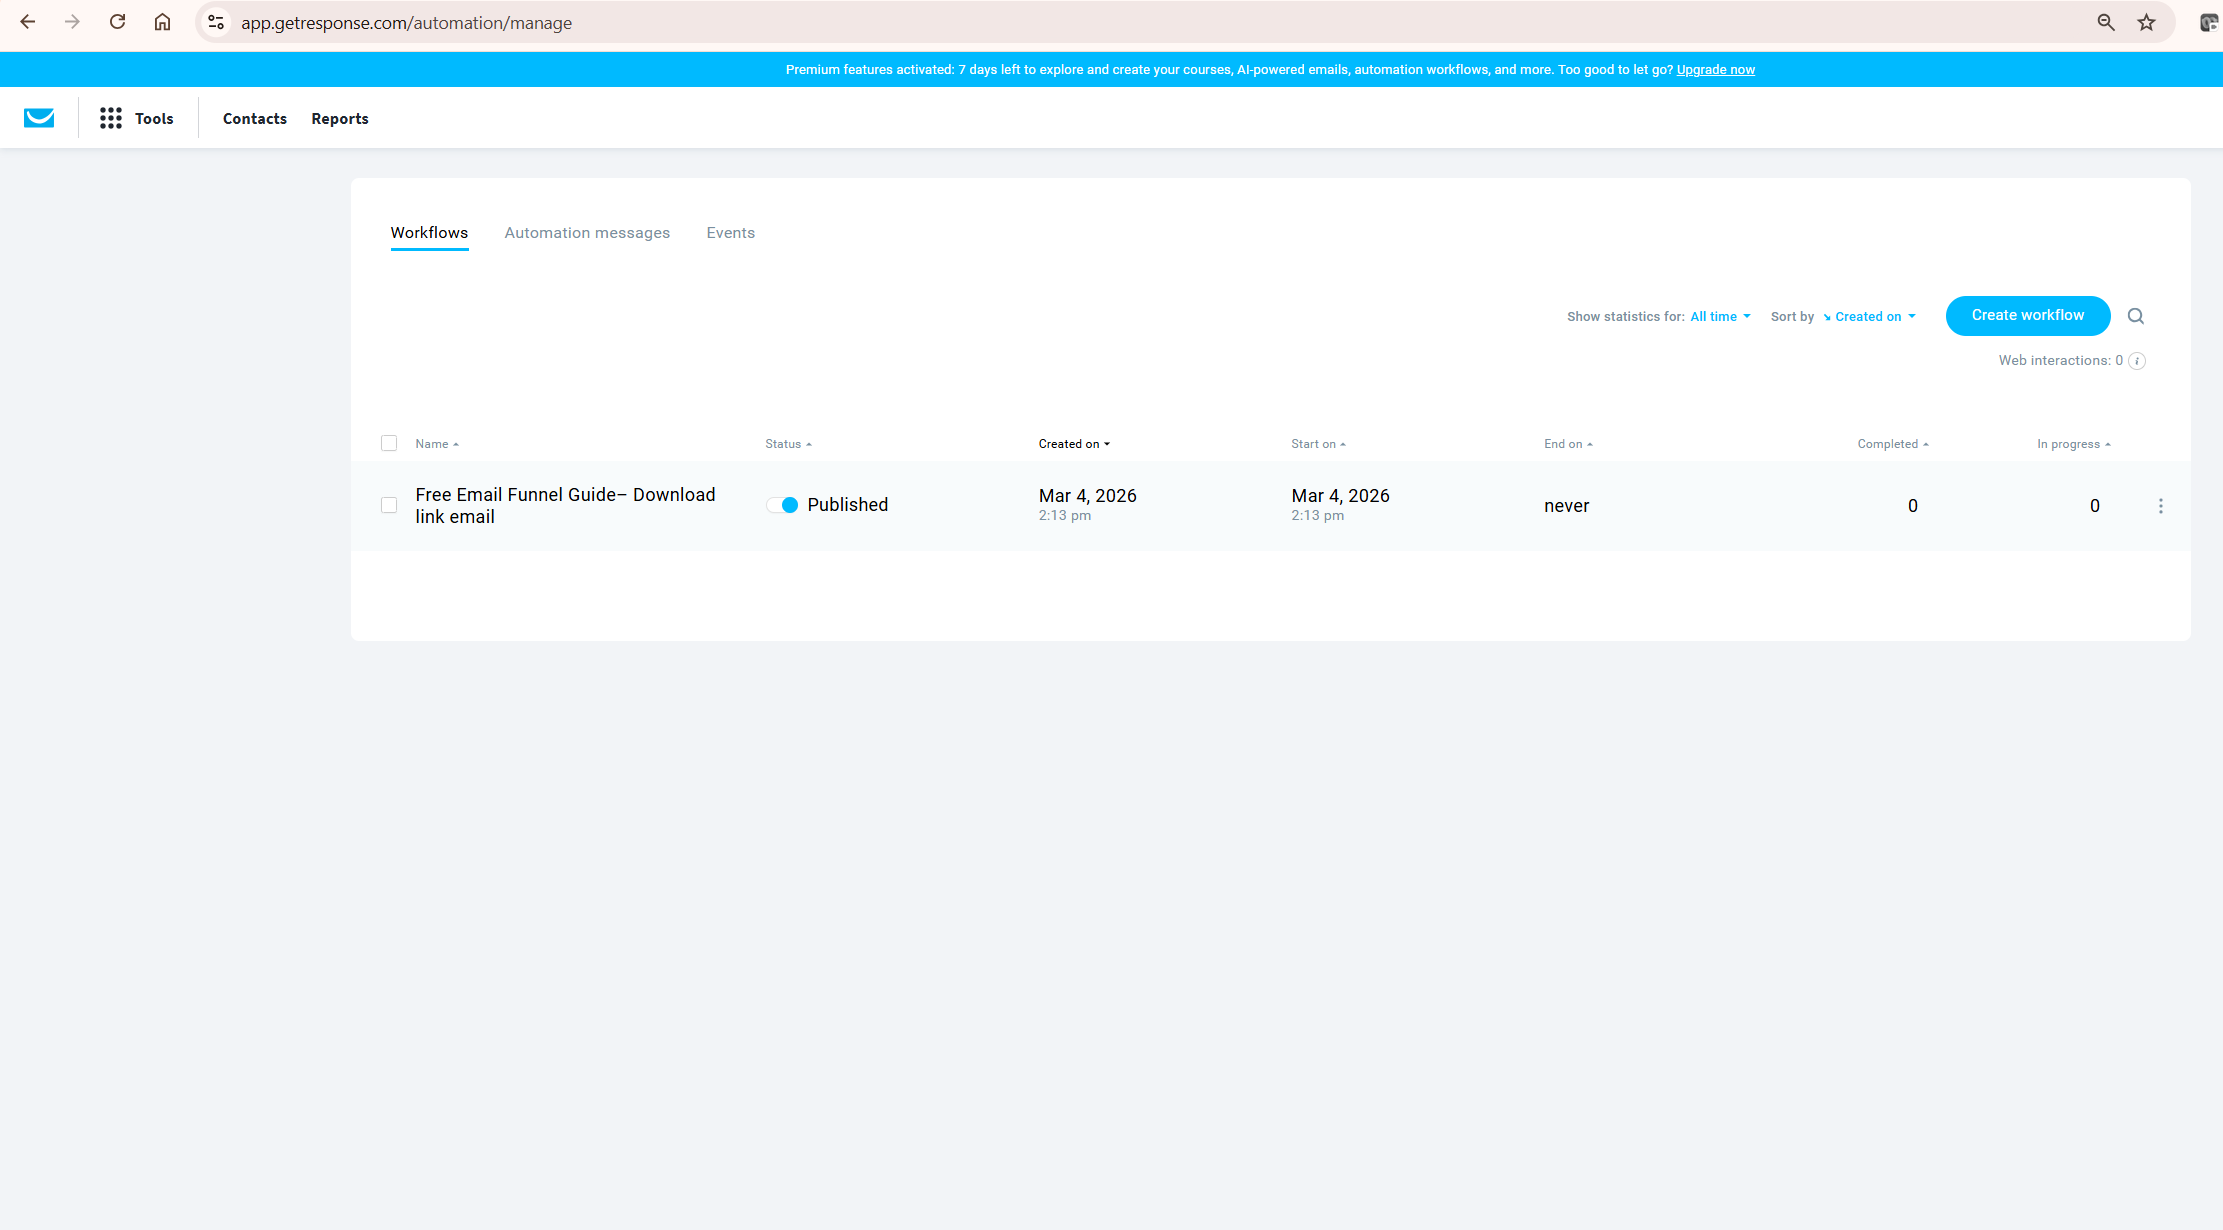
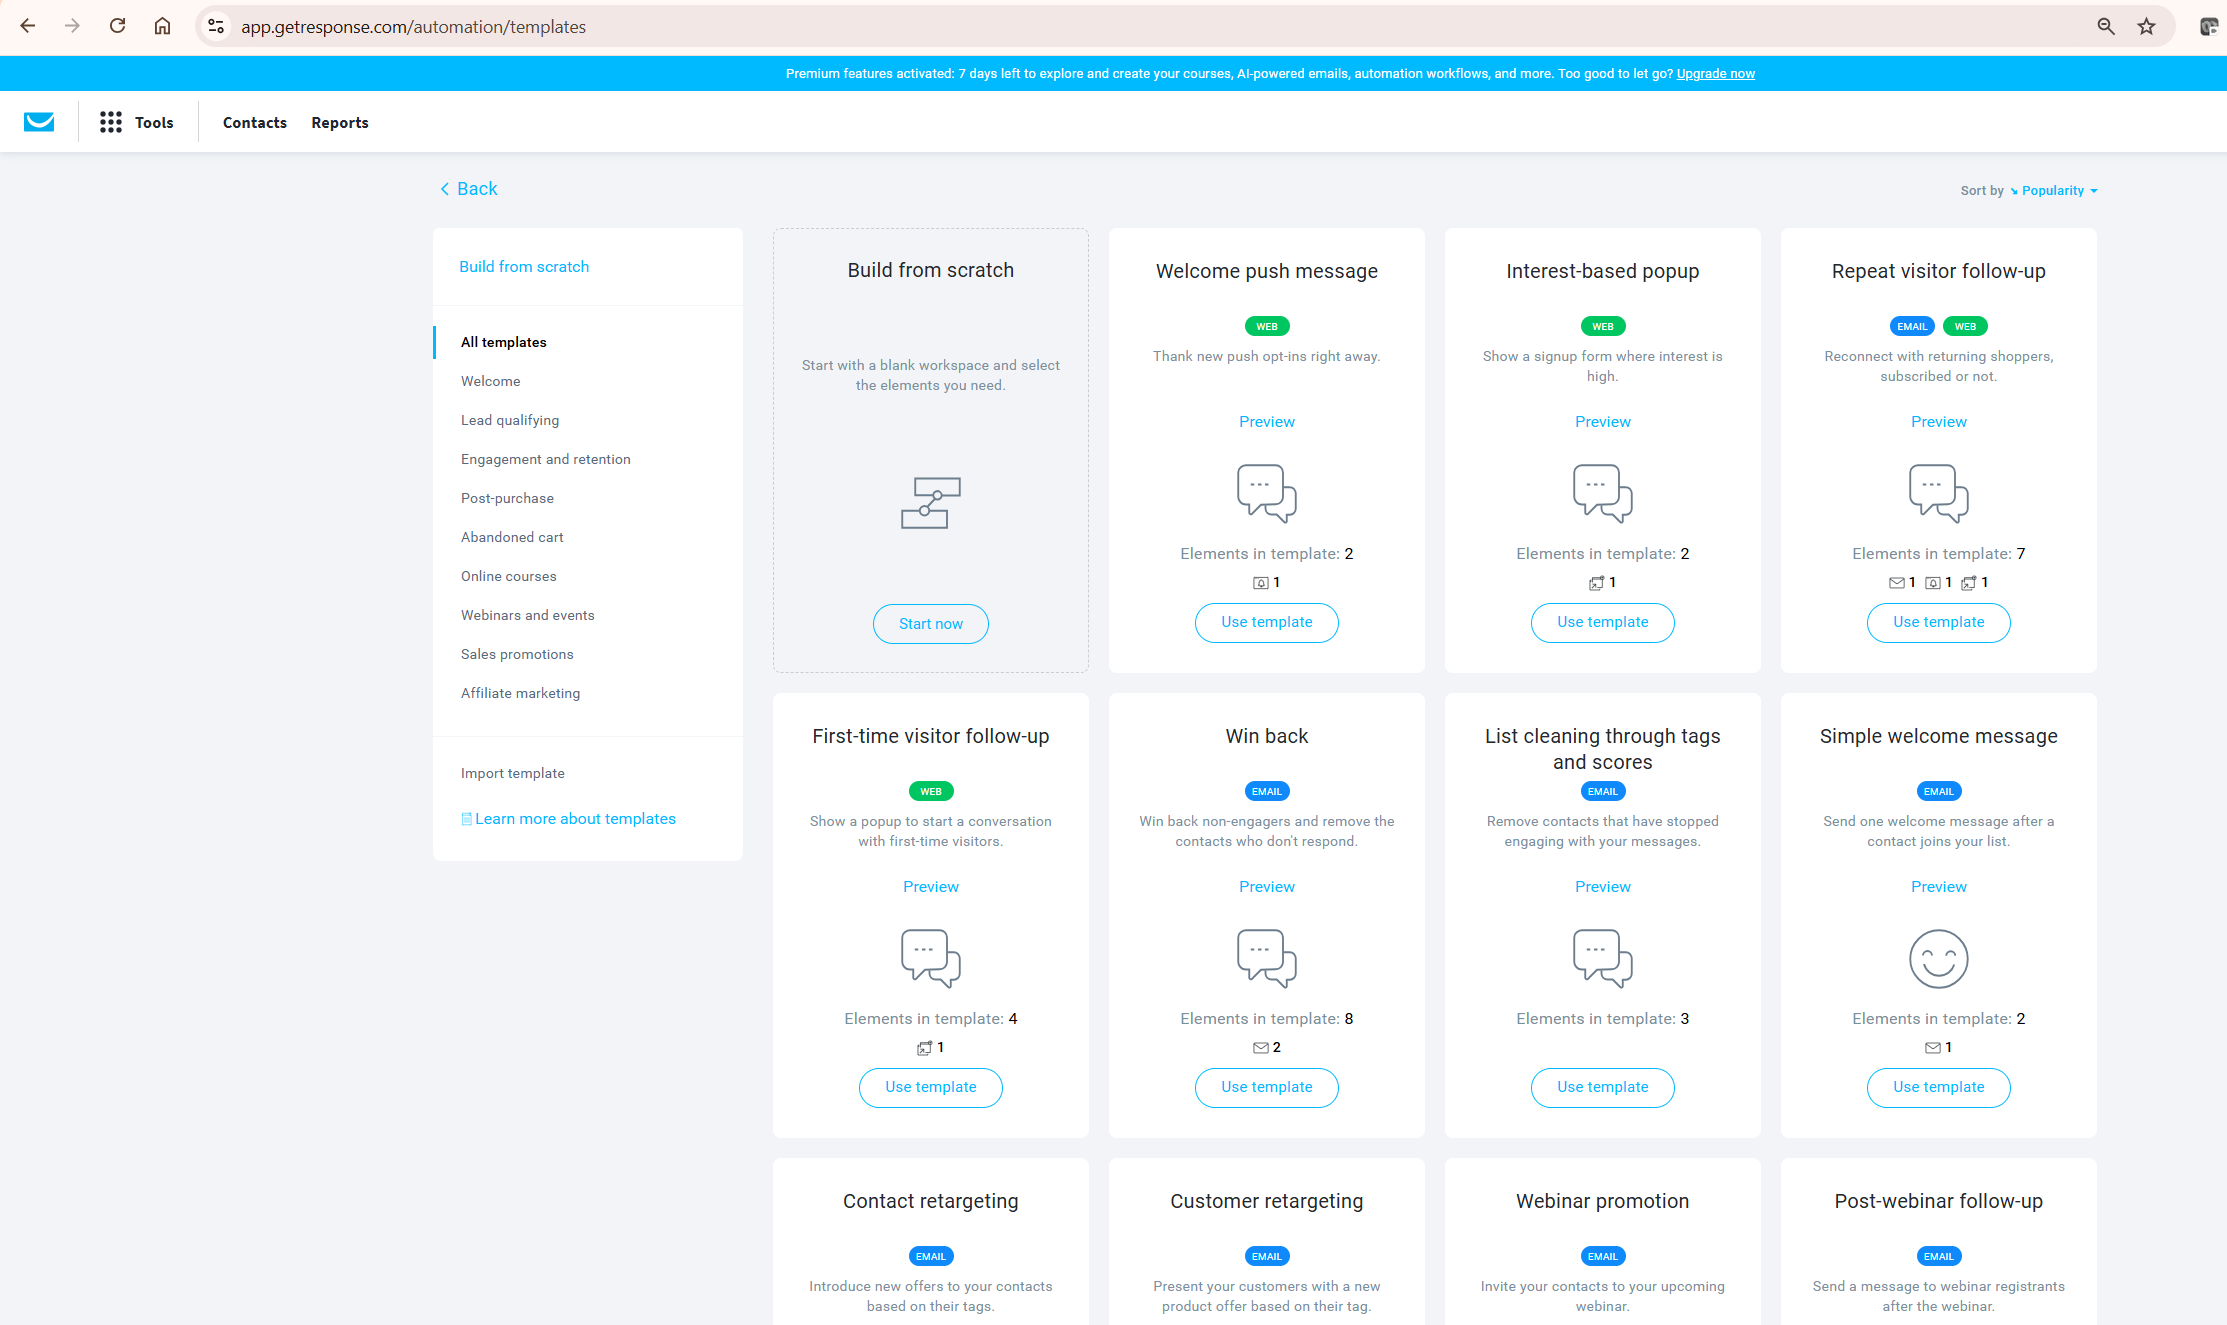
Click Create workflow. GetResponse automation offers templates or a blank canvas. For affiliate marketing, open the Affiliate marketing template category and review the “Tagging affiliate contacts” template once — it shows how the platform structures the trigger → send → condition → tag logic. Study the architecture, then close it and build your own. Templates are structural references, not finished strategies.
The Three Building Blocks of Every GetResponse Automation Workflow
Before building your first workflow, understanding GetResponse automation’s three core elements removes most of the confusion beginners encounter.
Triggers start the workflow. A subscriber joins a list, clicks a link, opens an email, or reaches a score threshold — these events fire the trigger and move the contact into the sequence. Every workflow has exactly one trigger.
Conditions create branches based on what a subscriber does or does not do. Did they click the link in Email 2? Have they been inactive for 30 days? Does their lead score exceed 40? Conditions route different subscribers down different paths within the same workflow — this is what transforms a flat autoresponder into a behavioural system.
Actions are what the workflow does to the subscriber: send an email, apply a tag, add a lead score, move them to a different list, or wait a specified number of days. Most elements in a workflow are actions. The combination of Trigger → Condition → Action is the repeating pattern behind every GetResponse automation workflow, no matter how complex it becomes.
| Building Block | Purpose | Examples |
|---|---|---|
| Trigger | Starts the workflow | Subscribed to list, link clicked, score reached |
| Condition | Creates behavioural branches | Link clicked? Yes/No. Inactive 30 days? Yes/No. |
| Action | What happens to the subscriber | Send email, apply tag, add score, wait 2 days |
Step-by-Step: Building a GetResponse Automation Workflow for Affiliate Marketing
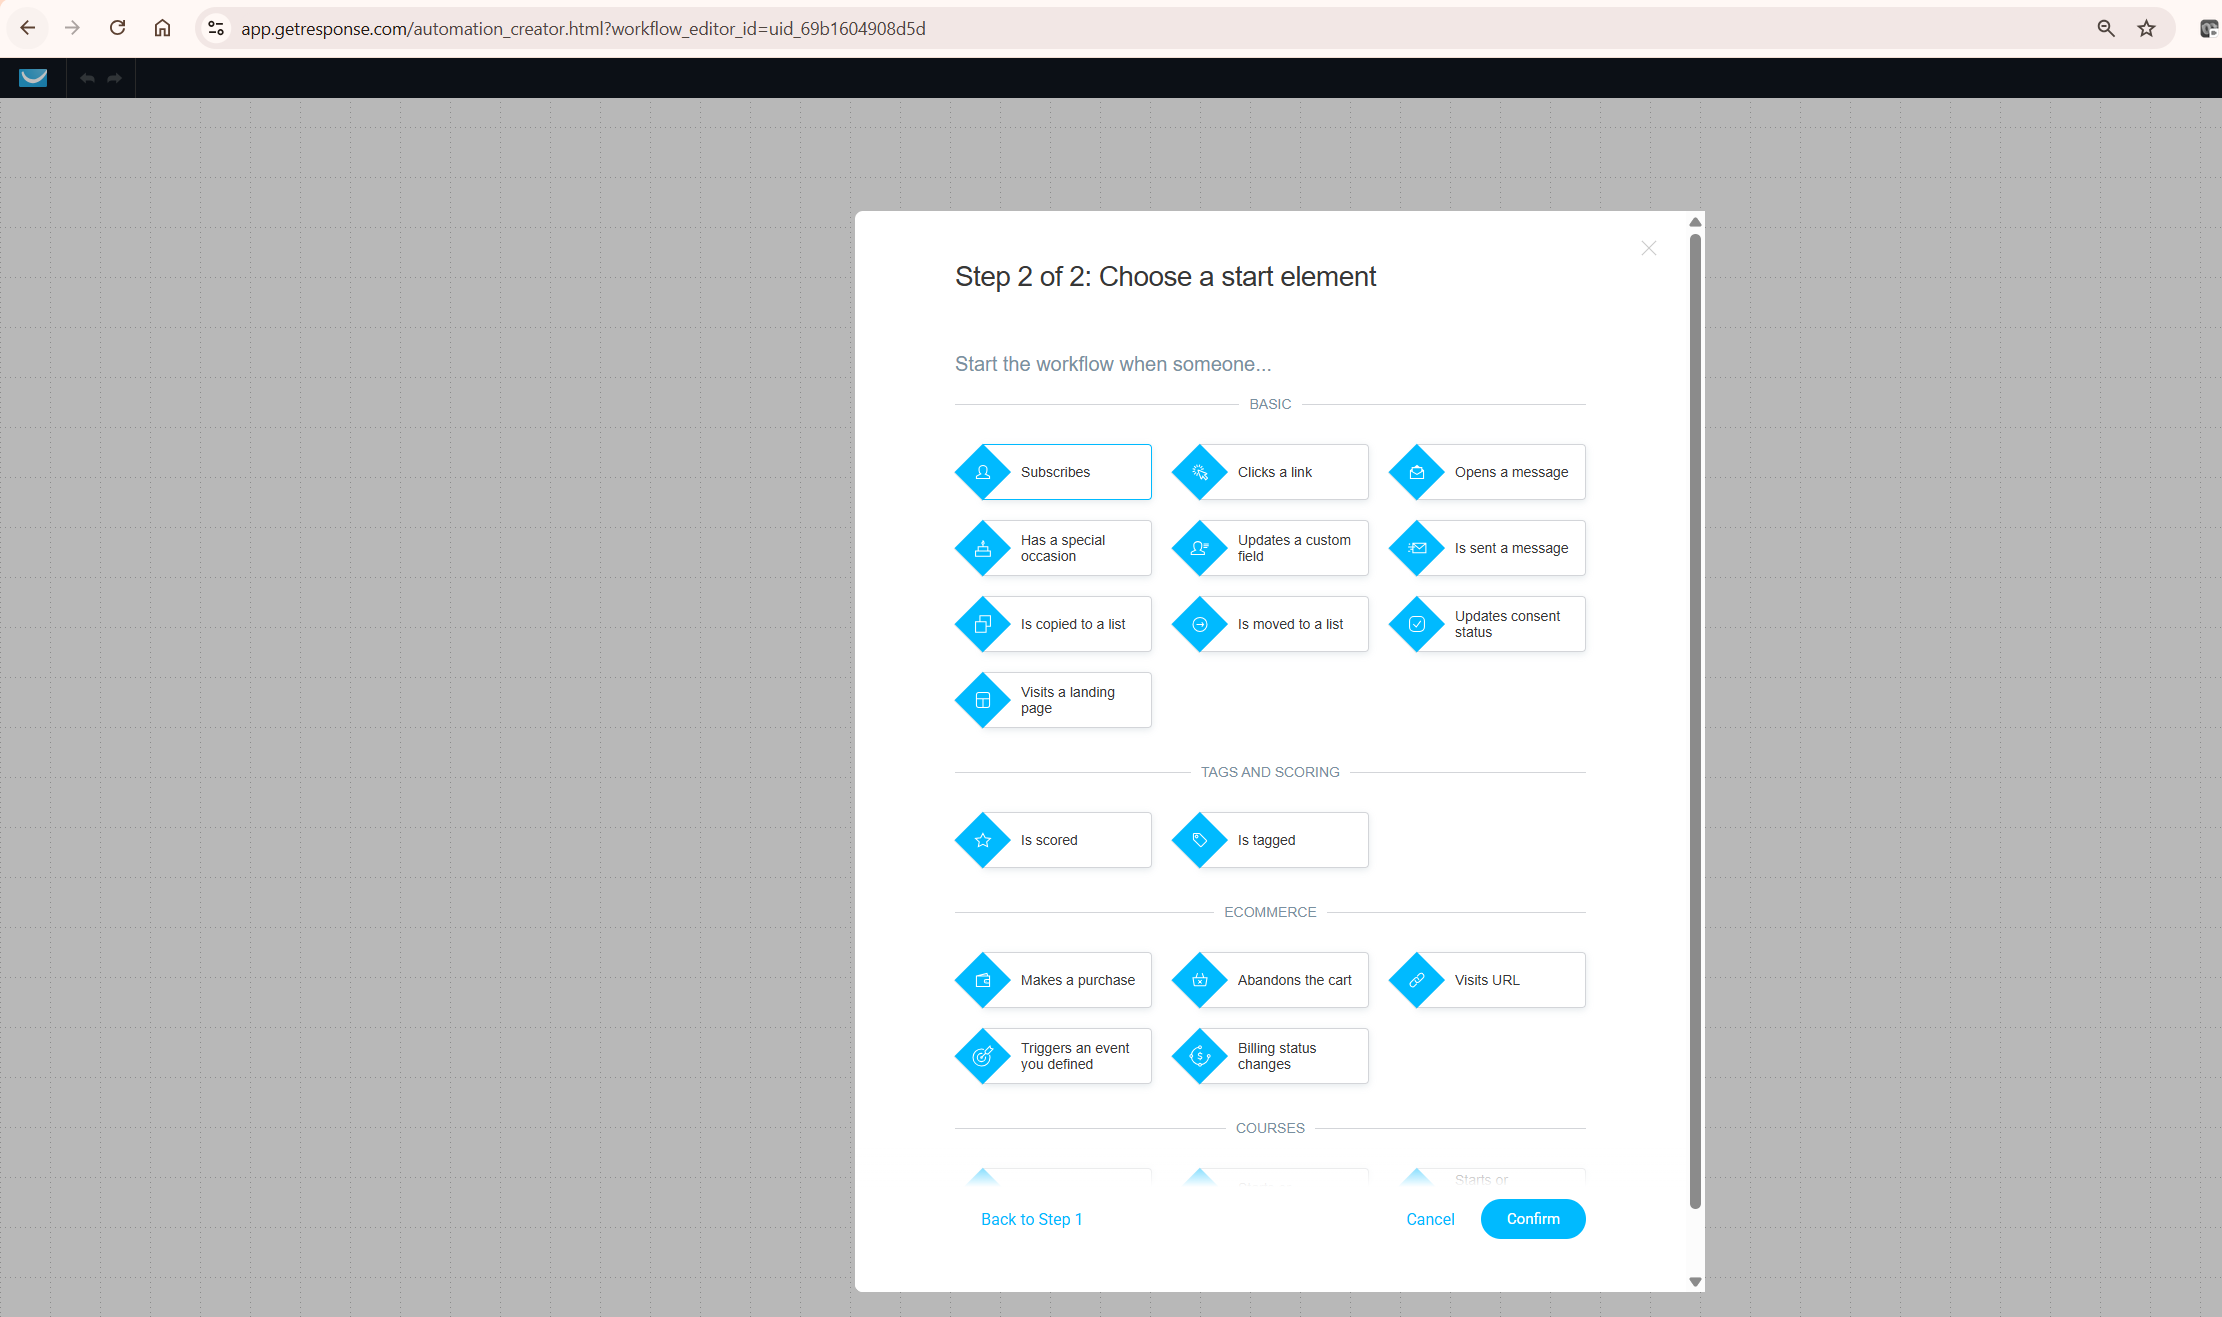
When creating a new workflow, GetResponse automation first asks you to choose a channel. Select Email. Web automation — which triggers based on page visits rather than email behaviour — is available on higher plans but is a secondary layer. Email is the primary monetisation channel and the starting point for every affiliate sequence.
Step 1: Set the Trigger
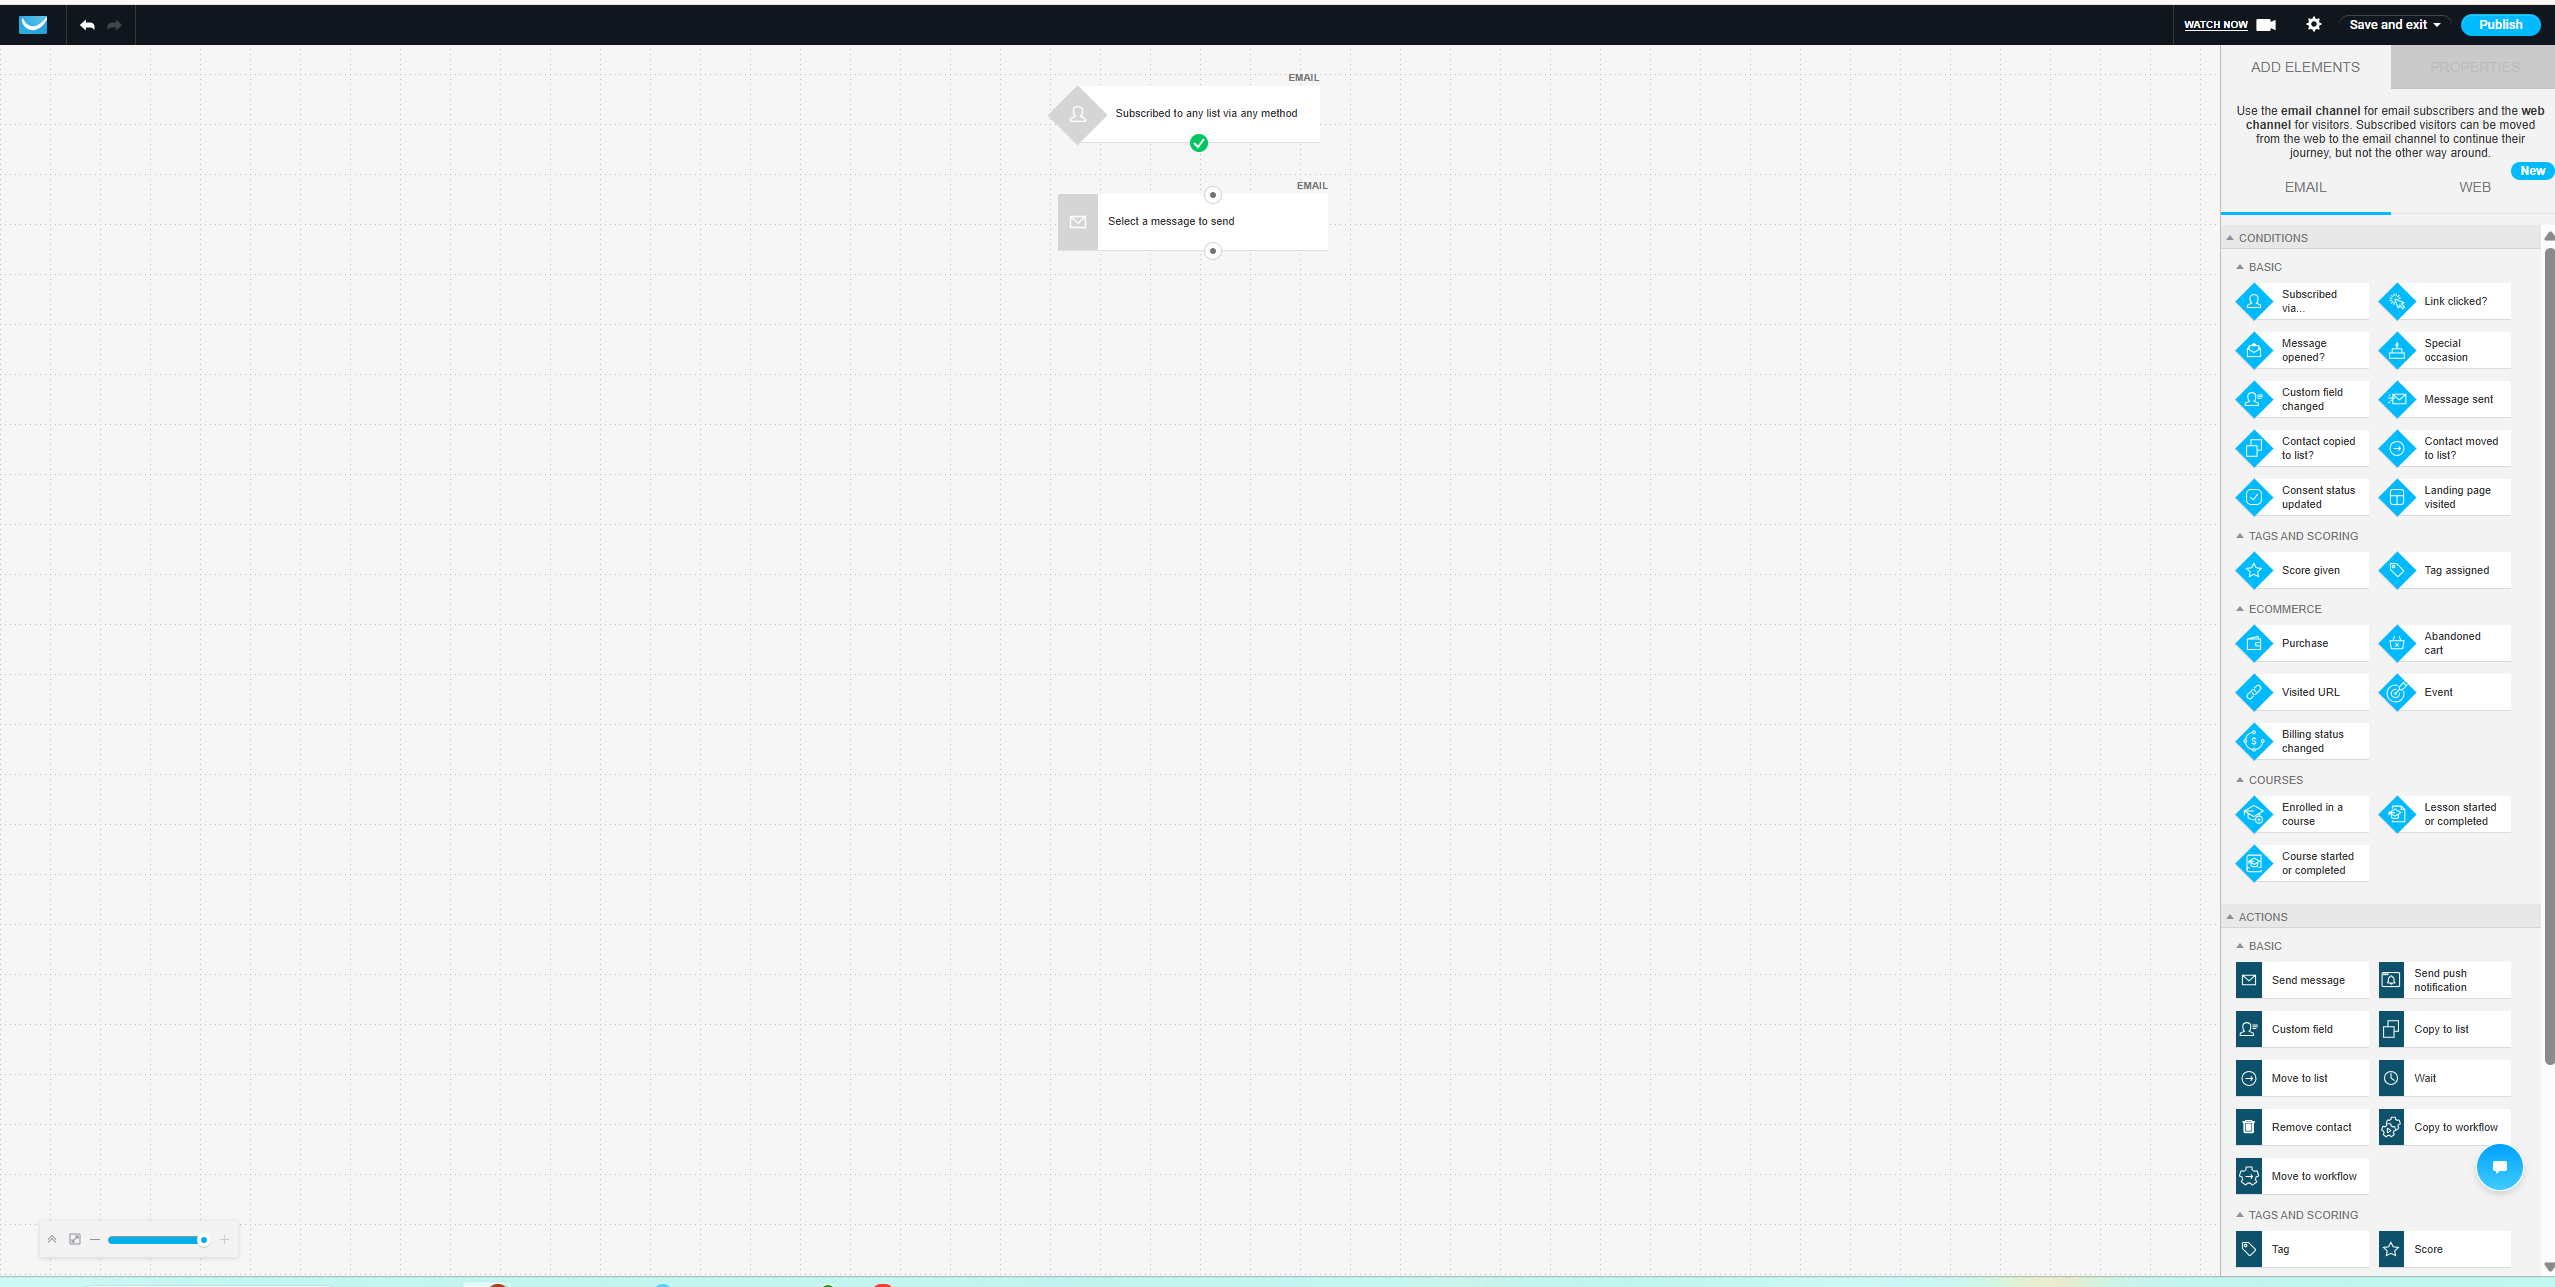
The trigger starts your workflow. For a standard affiliate lead magnet funnel, choose Subscribed to any list — or a specific list if you are running multiple lead magnets for different audience segments. This fires the instant someone confirms their subscription, meaning lead magnet delivery is immediate and requires no manual action.
Step 2: Apply a Source Tag Immediately
Before sending any email, add a Tag action directly after the trigger. Name the tag after the lead magnet or traffic source that brought this subscriber in. Crypto tax guide subscribers get tagged source_crypto_tax. Trading tools subscribers get tagged source_trading. SEO content subscribers get tagged source_seo.
This source tag is the most important data point in your entire automation system. Every personalised recommendation, every targeted broadcast, every segmented campaign you run in future depends on knowing where each subscriber came from. Plan your tag naming convention before you build so it stays consistent across all workflows.
Step 3: Deliver the Lead Magnet — Email 1
Email 1 has one job: deliver what you promised. The download link, a confirmation of what they have received, and a single sentence setting expectations for the next email. Nothing else. No affiliate links. No secondary offers. A subscriber who joined sixty seconds ago is not ready to buy anything. The first email either confirms that this is a list worth being on, or it damages the relationship before it has begun.
Step 4: Add a Wait Element
After the lead magnet delivery, add a Wait element set to one or two days. This pacing communicates that you are not going to immediately follow a free download with a promotion — the pattern that triggers instant unsubscribes. It also gives the subscriber time to use the lead magnet before the next email arrives.
Step 5: Send a Value Email — Email 2
Email 2 delivers a standalone insight that extends the lead magnet topic. No sales angle, no affiliate link, no CTA beyond a soft suggestion to reply with a question. A single specific tip the subscriber can act on in under ten minutes is the right format. The goal here is not conversion — it is demonstrating that you understand the subscriber’s problem at a level that earns the right to make a recommendation in the next email.
Step 6: Add a Condition — If Link Clicked
After Email 2, add a Condition block set to Link clicked. This is the branching point that turns a flat autoresponder into a behavioural system. Subscribers who clicked move down the YES path — they have shown active engagement and are ready for a more direct sequence. Those who did not click move down the NO path and receive a lighter follow-up rather than an immediate pitch.
This single conditional branch stops you from sending the same affiliate offer to a highly engaged subscriber and one who has not interacted since the lead magnet delivery. That distinction is the primary driver of conversion rate improvement in a properly structured affiliate sequence.
Step 7: Introduce the Affiliate Product — Email 3 (Engaged Path Only)
For subscribers on the YES path, Email 3 introduces the affiliate product as a natural continuation of the problem addressed in the sequence. One specific use case. One honest limitation acknowledged briefly. One contextual affiliate link. Apply a behavioural tag at this point: seen_affiliate_intro_[product]. This tag allows a targeted follow-up seven days later for subscribers who clicked the affiliate link but did not convert — without sending that follow-up to the entire list.
The Tagging Architecture That Makes GetResponse Automation Scale
Tagging is where GetResponse automation moves from useful to genuinely powerful — but only if the architecture is planned before you build. You need three tag categories: source tags, behavioural tags, and conversion tags.
Source tags record how the subscriber arrived. Behavioural tags record what the subscriber does through the sequence. Conversion tags record high-value actions — clicking an affiliate link, visiting a pricing page, completing a purchase.
A practical tag structure for a four-product affiliate site: source tags — source_crypto, source_trading, source_seo, source_email_mktg. Behavioural tags — engaged_email2, engaged_email3, inactive_30d. Conversion tags — clicked_koinly, clicked_tradingview, clicked_getresponse, clicked_semrush.
With this structure, you can at any time export a segment of subscribers tagged source_crypto and clicked_koinly but not purchased and send a targeted follow-up. That level of precision is available natively on the Marketer plan. Build this tag architecture before your first workflow — retrofitting a consistent naming system onto an untagged list is significantly harder than building it correctly from the start.
Workflow Examples by Affiliate Cluster
Here is how the trigger-tag-sequence structure maps to a four-product affiliate site in practice.
| Affiliate Cluster | Lead Magnet | Entry Trigger | Source Tag | Affiliate Email Focus |
|---|---|---|---|---|
| TradingView | Trading indicators guide | Subscribed to Trading list | source_trading | Charting platform recommendation |
| Koinly | Crypto tax checklist | Subscribed to Crypto Tax list | source_crypto_tax | Crypto tax software recommendation |
| Semrush | SEO content checklist | Subscribed to SEO list | source_seo | Keyword research tool recommendation |
| GetResponse | Email funnel template | Subscribed to Email list | source_email_mktg | Email marketing platform recommendation |
Also name your workflows descriptively from the start. “Workflow 1” tells you nothing when you have twelve running simultaneously. Use the format: Lead Magnet – [Cluster] — for example, “Lead Magnet – Crypto Tax” or “Re-engagement – TradingView.” This takes thirty seconds and saves significant confusion when reviewing analytics three months later.
Lead Scoring Inside GetResponse Automation
Lead scoring assigns numerical points based on subscriber actions. Open an email: +5 points. Click a link: +10 points. Visit a pricing page: +15 points. Miss three consecutive emails: −5 points. Over time, the score gives you a single number representing each subscriber’s engagement level — usable as a condition inside any workflow.
For affiliate marketing specifically, scoring is most useful for identifying high-intent subscribers who have engaged consistently but have not yet converted. A subscriber scoring above 40 who carries the tag clicked_koinly but not purchased is a candidate for a personalised follow-up. Negative scoring matters equally: missed email (−2 points), no opens in 14 days (−5 points), no activity in 30 days (−10 points). A subscriber below 10 after two weeks is a candidate for the re-engagement branch or list removal — and negative scoring surfaces those contacts automatically without manual list reviews.
Scoring is available from the Marketer plan upward — see the GetResponse pricing guide for a full breakdown of what each plan includes. Do not implement scoring in your first workflow. Build tagging first, get the basic sequence running cleanly with real subscriber data, then add scoring in a second iteration based on what the analytics show you.
Building the Re-Engagement Branch
Every workflow needs a re-engagement path for inactive subscribers. Without it, your list accumulates cold contacts that inflate your subscriber count, damage your sender reputation, and drag down open rates across your entire account.
Set a condition at 30 days of no opens. Route inactive subscribers into a two-email re-engagement sequence — one email with a changed subject line and a direct question, followed by a three-day wait, followed by a final email offering a clear unsubscribe option alongside a reason to stay. Subscribers who re-engage receive the tag re_engaged and return to the main nurture path. Those who do not engage after both emails should be removed from the active list.
A smaller, active list delivers better results than a large, inflated one on every metric that matters for affiliate revenue — open rate, click rate, and revenue per subscriber.
Common Mistakes When Using GetResponse Automation for Affiliate Marketing
Sending an affiliate link in the first email. A subscriber who joined thirty seconds ago has no reason to trust your recommendation. The first email earns trust. If that foundation is damaged by an immediate pitch, the rest of the sequence performs poorly regardless of how well it is built.
Building an overcomplicated workflow before you have subscriber data. Start with the simplest version that works — trigger, tag, three emails, one conditional branch. Then add complexity based on what the analytics actually show. GetResponse automation displays per-block statistics inside every published workflow — use that data to iterate rather than building on assumptions.
Not testing the workflow before sending it to real subscribers. A misconfigured tag or a broken link in the lead magnet delivery email affects every subscriber who enters the workflow from that point forward. Subscribe with your own email address, move through every path manually, and confirm every tag is applied correctly before publishing.
Is GetResponse Automation Worth It for Affiliate Marketers?
For an affiliate content site, yes — with one honest limitation worth stating. GetResponse automation combines the workflow builder, tagging, lead scoring, landing pages, and email delivery in a single platform. The visual canvas is genuinely easy to work with, and the conditional logic available from the Marketer plan covers everything a content-based affiliate site needs for serious audience segmentation.
The honest limitation: GetResponse automation’s A/B testing inside workflows is less granular than ActiveCampaign’s. If you need to systematically test subject lines and send-time variations across multiple simultaneous automated sequences with statistical significance tracking, ActiveCampaign provides more controls. For an affiliate content site under 10,000 subscribers, that gap is not a practical issue — but it is worth knowing before committing to a higher-tier plan.
GetResponse holds strong ratings from verified users on G2 specifically for automation ease of use. For a full platform assessment beyond automation, read the full GetResponse review. For a direct comparison with the closest competitor, see GetResponse vs ActiveCampaign.
What To Do Next
Do this in the next thirty minutes. Log in to GetResponse, go to Tools → Automation, click Create workflow, select Email channel, and set the trigger to Subscribed to any list. Add a Tag action immediately — name it after your lead magnet source. Add a Send message action pointing to your lead magnet delivery email. Add a Wait element set to two days. Add a second Send message for your value email. Publish it.
That five-element sequence — trigger, tag, deliver, wait, value email — is a working system. Every subscriber gets tagged at entry. The lead magnet delivers automatically. The value email follows two days later without any manual action. Add one new element per week from that point. The conditional branch in week two. The affiliate introduction email in week three. The re-engagement path in week four. Within a month you will have a fully segmented workflow running on your live list.
Start your GetResponse free trial here — no credit card required.
Frequently Asked Questions
Do I need the Marketer plan for GetResponse automation to work for affiliate marketing?
Yes, for any serious affiliate marketing setup. The Starter plan limits automation to one workflow with a maximum of six elements and does not support tags or lead scoring — which removes the two core mechanisms of behavioural segmentation. The Marketer plan unlocks unlimited workflows, full tagging, conditional branching, and scoring. For a multi-product affiliate site, the Marketer plan is the minimum viable option.
When should I introduce an affiliate link inside a GetResponse automation sequence?
Not before Email 3, and only for subscribers who have shown active engagement in a previous email. The standard sequence is: deliver lead magnet, send one pure value email, then introduce the affiliate product in the third email as a natural solution to the problem addressed in the value email. For many affiliate lists, introducing a sales pitch immediately often results in higher unsubscribe rates and lower engagement than providing value first.
Can I run separate GetResponse automation workflows for different affiliate products?
Yes, and this is the recommended approach for a multi-product affiliate site. On the Marketer plan, workflows are unlimited. Build one workflow per lead magnet or traffic source, apply source tags at the entry trigger, and use those tags to control which affiliate recommendations each subscriber receives. Running separate, cleanly-tagged workflows per product cluster is significantly more effective than routing all audiences through a single shared sequence.
What metrics should I track inside GetResponse automation analytics?
Focus on open rate per email in the sequence, click rate on affiliate links specifically, and conversion rate per source tag. Revenue per subscriber by tag segment is the most useful long-term metric — it identifies which lead magnets are generating actual affiliate income rather than just list growth. Per-block statistics inside the workflow show exactly which step is causing drop-off. Review these numbers after the first 100 subscribers have moved through the workflow before making structural changes.
Can I copy an automation workflow in GetResponse?
Yes — GetResponse allows you to duplicate existing workflows. From the automation workflows dashboard, click the options menu on any workflow and select Duplicate. The copied workflow is saved as a draft, allowing you to modify the trigger, tags, and emails before publishing. This is the fastest way to build a second product cluster sequence once you have a proven structure from your first workflow. Verify the current copy functionality in your GetResponse account as interface options can change between platform updates.
How many automation workflows can I build in GetResponse?
On the Marketer and Creator plans, the number of automation workflows is unlimited. On the Starter plan, you are limited to one workflow with a maximum of six elements. For a multi-product affiliate site running separate sequences per lead magnet, unlimited workflows is a practical requirement — the Marketer plan is the minimum viable option. Always verify current plan limits at getresponse.com as plan features are updated periodically.
How do I prevent inactive subscribers from damaging deliverability?
Build a re-engagement branch inside every workflow triggered at 30 days of no opens. Route inactive subscribers into a two-email re-engagement sequence — a subject line variation first, then a clear unsubscribe offer. Remove those who do not engage after both emails. Allowing inactive contacts to accumulate silently degrades deliverability for the entire account. A smaller, active list delivers better results than a large, inflated one on every metric that matters for affiliate conversion.
