
How to Use GetResponse: Complete Step-by-Step Guide (2026)
Affiliate Disclosure: This article contains affiliate links. If you purchase through these links, I may earn a commission at no extra cost to you. I only recommend tools I have personally used and genuinely believe in. Read my full disclosure policy.
If you have just signed up and are wondering how to use GetResponse effectively — and the dashboard is staring back at you with no obvious starting point, you are not alone. The platform does a lot — email marketing, automation, landing pages, webinars, conversion funnels — and the breadth that makes it powerful is the same thing that makes it feel overwhelming on day one. I am Andreas Maratheftis, with 30 years of professional finance experience, and I use GetResponse to run the email infrastructure for InnovateHub Finance. This guide covers how to use GetResponse step by step in the exact order that gets you to a functioning email list and automation sequence as quickly as possible — without wasting time on features that do not matter at your current stage.
By the end of this guide, you will have a working email marketing setup: your list, your landing page, your lead magnet delivery automation, and your first newsletter campaign configured and ready to send.
One important note before the steps: GetResponse’s free account includes a 14-day trial of premium features, with some limitations depending on the feature — webinars are capped at 10 attendees, marketing automation has restrictions, and all emails carry the GetResponse badge. The most effective thing you can do is use that trial window to build your core email infrastructure before the account reverts to the free plan limits. By day 14, your landing page, welcome sequence, and lead magnet delivery should all be ready. This guide is structured around that timeline.
→ Don’t have GetResponse yet? Start free — test premium features for 14 days, no credit card required
Quick Answer: How Do You Use GetResponse?
To use GetResponse for affiliate marketing: create your account → authenticate your domain (DKIM/SPF) → import or start building your contact list → create a landing page for your lead magnet → set up an automation workflow to deliver the lead magnet and run your welcome sequence → create your first email newsletter. That sequence, in that order, gives you a fully functioning email marketing system. Everything else — webinars, conversion funnels, courses — builds on top of that foundation.
What Is GetResponse and How Does It Work?
GetResponse is an all-in-one email marketing and automation platform that combines email campaigns, visual automation workflows, landing pages, webinar hosting, conversion funnels, and AI course creation under one subscription. Founded in 1998, GetResponse now reports 400,000+ customers worldwide across 183 countries.
When learning how to use GetResponse as an affiliate content site owner, the relevant features are email marketing, automation workflows, and landing pages. The webinar and course creation tools become relevant once the site generates consistent revenue and you want to add additional revenue streams. This guide focuses on the three core features you need first.
Step 1: Set Up Your Account and Authenticate Your Domain
Domain authentication is the first thing to do before sending a single email. Without DKIM and SPF records configured, your emails are more likely to land in spam — and fixing deliverability problems after they start is significantly harder than preventing them.
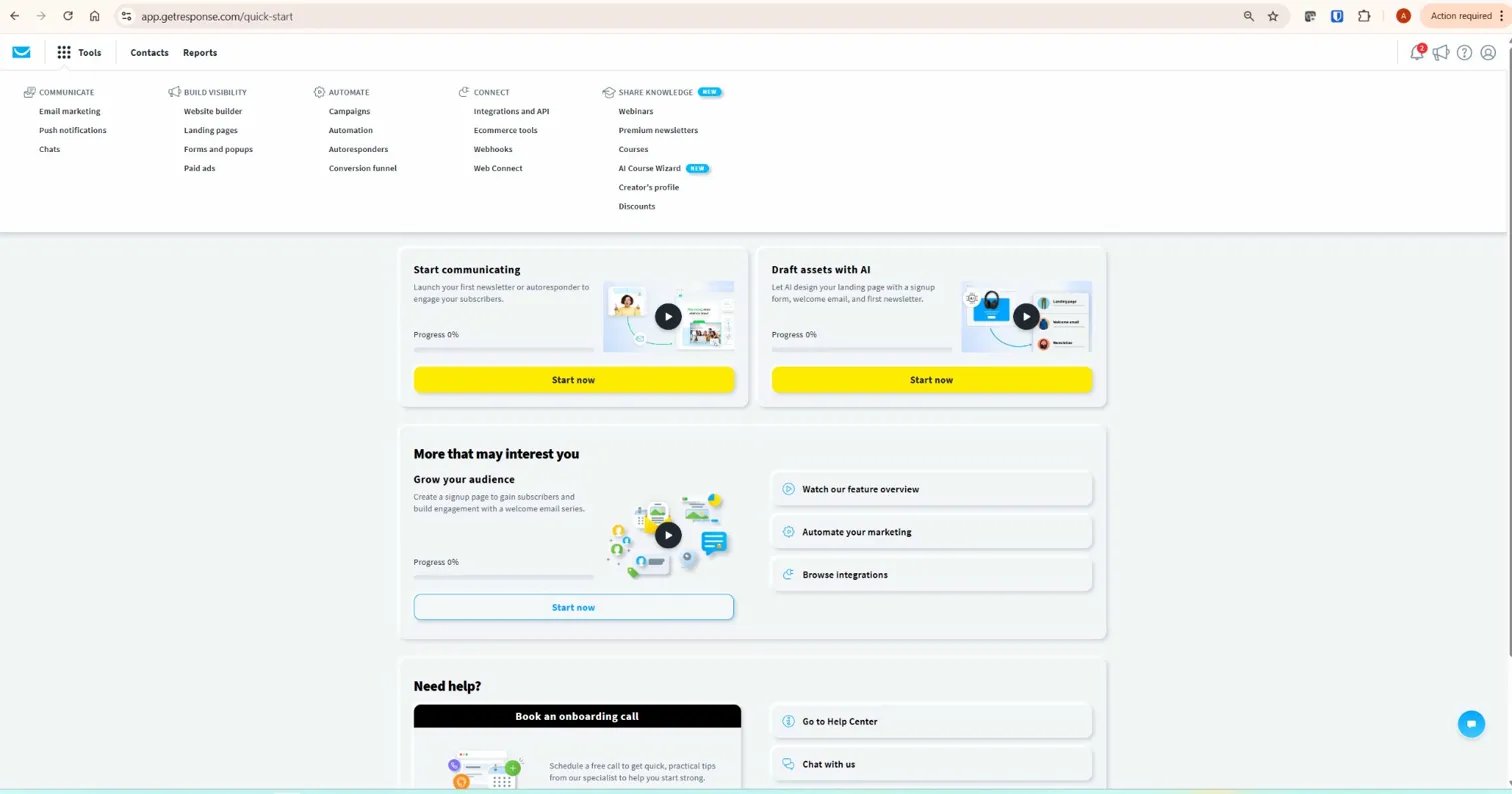
To authenticate your domain in GetResponse:
- Go to Tools → Domain Authentication in the top navigation
- Click Add Domain and enter your domain name
- GetResponse will generate DKIM and SPF DNS records
- Add these records to your domain’s DNS settings — in Hostinger this is under Domains → DNS Zone
- Return to GetResponse and click Verify — allow up to 48 hours for DNS propagation
Once verified, every email you send from GetResponse carries your domain’s authentication signature — which tells email providers the message is legitimately from you and significantly improves inbox placement rates.
After verification, send a test email to Gmail, Outlook, and your own business email address before sending to any subscribers. Check whether the message lands in the inbox, promotions tab, or spam folder. This simple test gives you an early warning of deliverability problems before real subscribers are affected.
Step 2: Create Your Contact List
GetResponse organises subscribers into lists. Before building any forms or landing pages, create your list structure first — it determines where new subscribers land when they opt in.
For a new affiliate content site, one list with tag-based segmentation is the right approach. Multiple lists cause two problems: the same subscriber on two lists counts twice toward your contact tier, and managing cross-list automation becomes unnecessarily complex. Start with a single list named after your site — “InnovateHub Finance” or similar — and use tags to differentiate subscribers by topic interest, lead magnet source, or engagement level.
To create a list: go to Contacts → Lists → Create List. Name it, add your sender details (the from name and email address your subscribers will see), and save. This list is the destination for every opt-in form and landing page you create.
If you are migrating from another platform, import your existing list via Contacts → Import Contacts → Upload CSV. GetResponse maps CSV columns to contact fields and does not require re-confirmation of imported subscribers — your existing list transfers intact.
Step 3: Create Your Lead Magnet Landing Page
Your landing page is the opt-in gateway for your lead magnet. GetResponse includes a full landing page builder on all plans — 200+ templates, an AI-powered builder option, and direct integration with your automation workflows.
To create a landing page: go to Tools → Landing Pages → Create Landing Page. Select “By myself” for template-based creation or the AI builder for a generated first draft. Choose a lead generation template — these are pre-optimised with a single form, headline area, and CTA button above the fold.
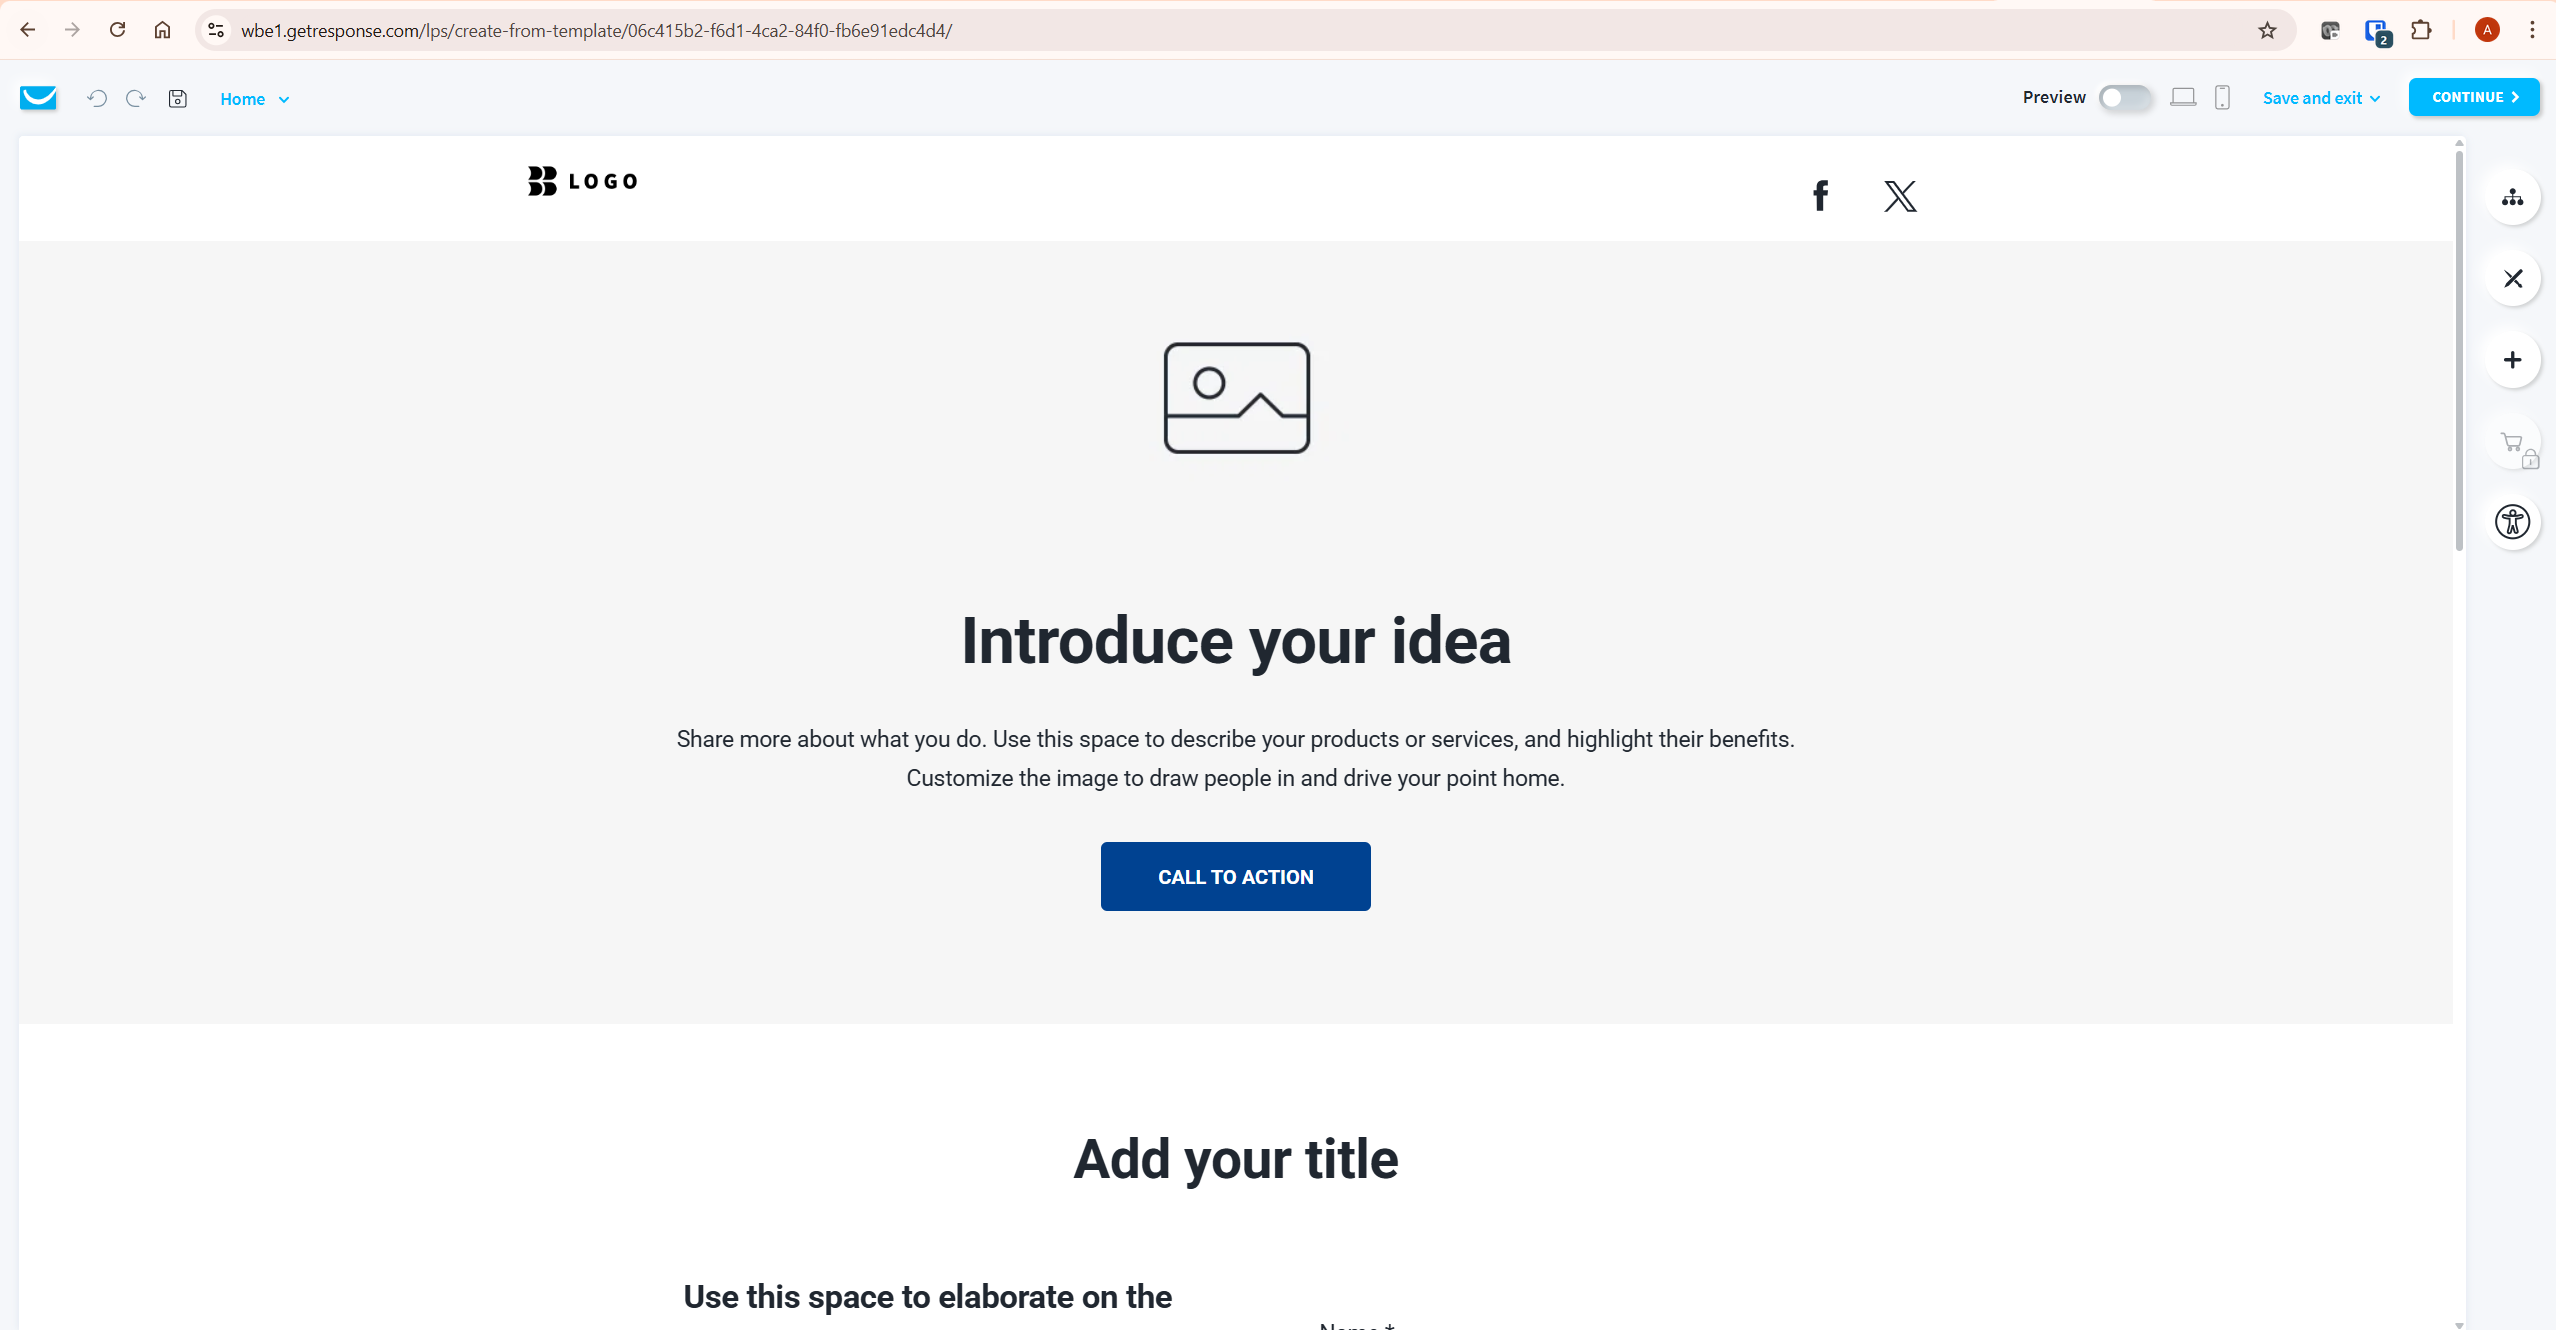
The most important step in the landing page setup is the Subscription settings screen — accessed by clicking Continue after your design is ready. This is where you:
- Select which list new subscribers join
- Toggle on Add contacts to an autoresponder cycle — set to Day 0 so lead magnet delivery triggers immediately on sign-up
- Enable double opt-in if you want confirmed subscribers (recommended for deliverability)
- Enable reCAPTCHA to block bot sign-ups
Without the autoresponder cycle toggled on, subscribers opt in but receive nothing automatically. This is the single most common mistake new GetResponse users make. For a complete walkthrough of the landing page builder, see our GetResponse landing page guide.
Step 4: How to Use GetResponse Automation
Automation is the core of how to use GetResponse effectively for affiliate marketing. Your automation workflow handles lead magnet delivery, welcome sequences, and nurture flows — all running without manual intervention.
One critical thing to know before building: the GetResponse Starter plan includes only one custom automation workflow. If you need multiple simultaneous sequences — one for each lead magnet, one re-engagement campaign, one product promotion series — you need the Marketer plan for unlimited workflows. Plan for this before you build, not after you hit the limit. Verify current plan limits at getresponse.com/pricing before committing to a plan.
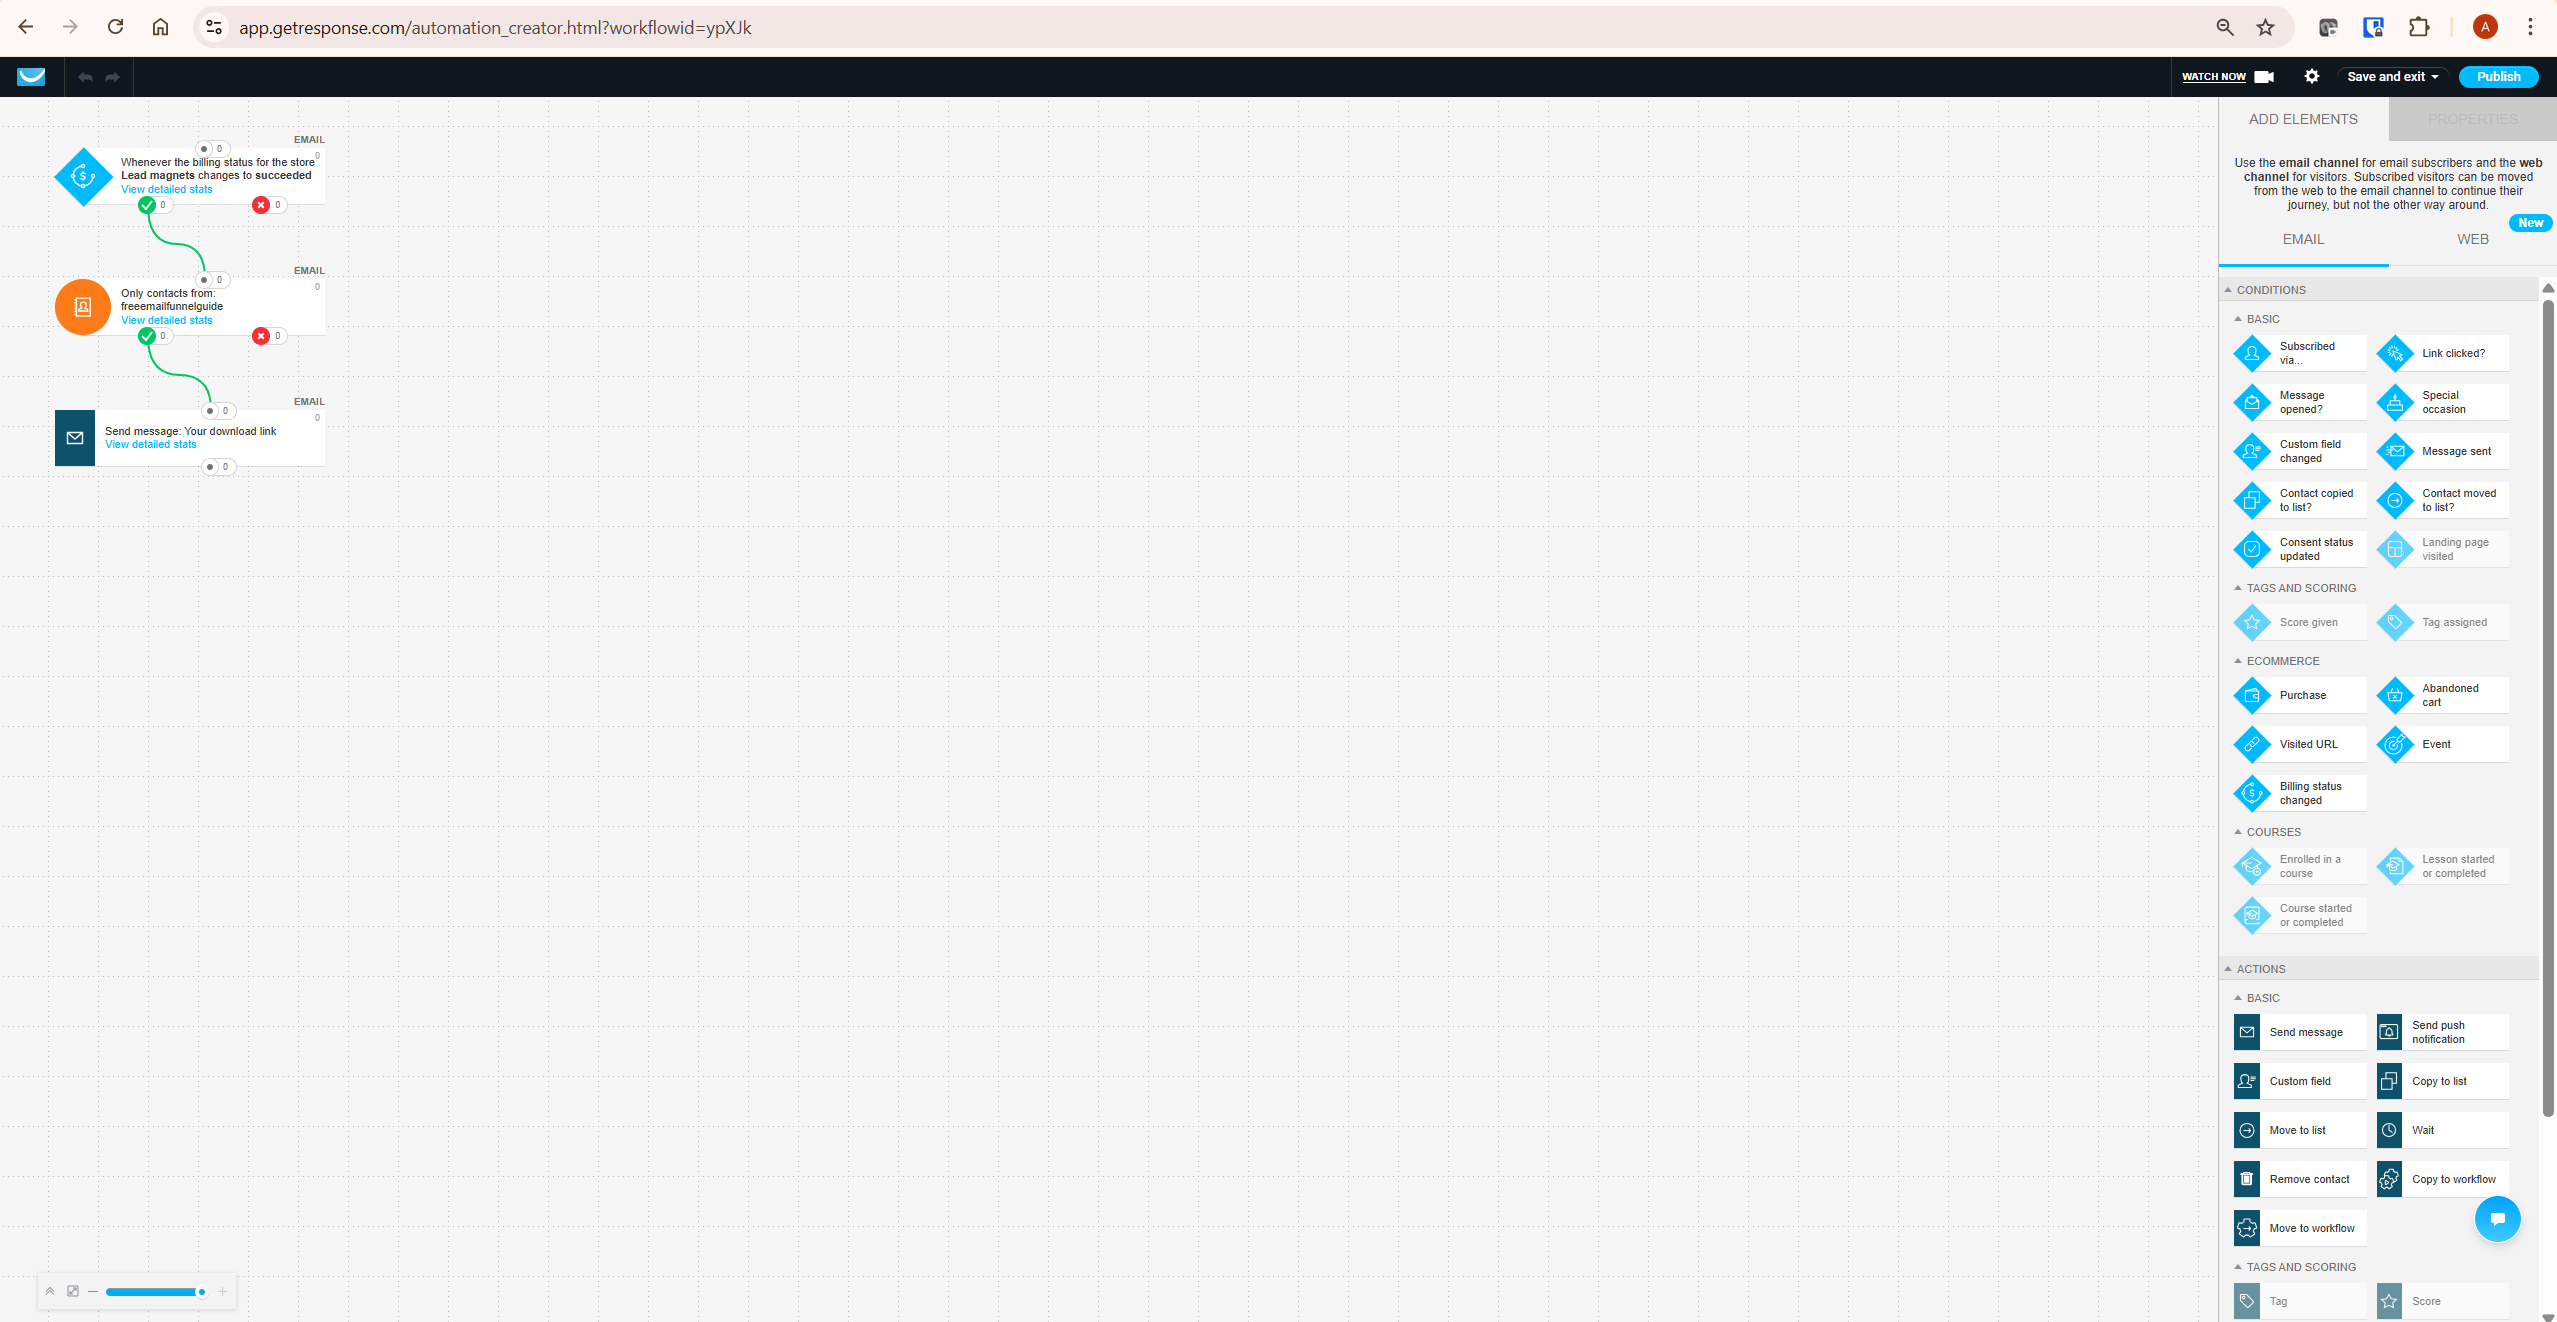
To create an automation workflow: go to Tools → Automation → Create Workflow. You can start from a blank canvas or choose from 50+ pre-built templates. For a lead magnet delivery sequence, the “Welcome message” template is the fastest starting point — it triggers when a subscriber joins your list and sends a sequence of emails at defined intervals.
Building a Basic Welcome Sequence
A functional welcome sequence for an affiliate content site has five steps:
- Trigger: Subscribed to list → set to your main list
- Send message (Day 0): Lead magnet delivery email — subject line “Your [lead magnet name] is here”, body contains the download link or the resource itself
- Wait (2 days)
- Send message (Day 2): Introduction email — who you are, what the site covers, what to expect from future emails
- Wait (3 days)
- Send message (Day 5): First value email — a useful insight from your content with a soft recommendation of a relevant tool or resource
This sequence runs automatically for every new subscriber from the moment they opt in. If you want to turn this basic sequence into a complete subscriber journey, see our full guide on how to build an email funnel with GetResponse. For more advanced automation setups including conditional branching and tag-based segmentation, see our guide on GetResponse automation for affiliate marketing.
Step 5: How to Use GetResponse Email Marketing
Once your automation is running, newsletters are how you maintain regular contact with your list. GetResponse’s email editor is a drag-and-drop builder with 200+ templates across different campaign types.
To create a newsletter: go to Email Marketing → Create Newsletter. The editor offers three creation paths: drag-and-drop templates, an AI email generator (which drafts body copy from a prompt), or a plain HTML editor. For most affiliate marketing use cases, the drag-and-drop editor with a minimal template is the right choice — clean design, clear CTA, easy to read on mobile.
Key newsletter settings to configure before sending:
- Subject line: Use the AI subject line generator for suggestions, then edit — do not use the generated line verbatim
- Preview text: The line of text after the subject in the inbox — set this to complement the subject line, not repeat it
- Recipients: Select your list or a segment — GetResponse allows sending to specific tags or segments without creating separate lists
- Send time: Schedule for a specific time or use GetResponse’s “Perfect Timing” feature which analyses your subscribers’ past open behaviour and delivers at the individually optimal time
Step 6: How to Use GetResponse Forms on Your Website
Your landing page captures subscribers from paid or social traffic. Your website forms capture subscribers from organic search traffic — people who find your articles on Google and are ready to opt in to your list. Both channels feed the same list and trigger the same automation sequence.
To create a form: go to Tools → Forms and Popups → Create Form. GetResponse offers four form types — embedded forms, popups, slide-ins, and fixed bars. For an affiliate content site, an exit-intent popup and a mid-article embedded form are the two highest-converting placements.
After creating the form, GetResponse provides a JavaScript snippet. In WordPress, add this via WPCode → Add Snippet → JavaScript, targeting specific pages or your entire site. The form connects to your chosen list and triggers the same automation as your landing page sign-ups — one consistent subscriber experience regardless of where the opt-in happens.
How to Use GetResponse: The Recommended Order
Most new users learning how to use GetResponse try to use everything at once and end up using nothing consistently. Here is the order that gets you to revenue fastest:
| Week | What to Build | Why This Order |
|---|---|---|
| Week 1 (during trial) | Domain authentication + contact list + landing page | Foundation — nothing else works properly without this |
| Week 1–2 (during trial) | Welcome sequence automation workflow | Revenue engine — runs without you from day one |
| Week 2 | Website opt-in forms embedded on top articles | Captures organic search traffic into your list |
| Week 3+ | First newsletter campaign | Maintains list engagement and drives affiliate clicks |
| Month 2+ | Additional automation sequences per topic cluster | Requires Marketer plan — build when list justifies cost |
GetResponse Setup Checklist
Use this checklist to confirm your GetResponse account is set up correctly before driving traffic to your opt-in pages:
- Domain authentication configured (DKIM and SPF verified)
- One main contact list created with sender details set
- Lead magnet landing page built and published
- Landing page connected to your list via Subscription settings
- Autoresponder cycle or automation workflow enabled on the landing page
- Opt-in process tested with your own email address — delivery confirmed
- Website opt-in forms added to your highest-traffic articles
- First newsletter drafted and scheduled
How to Use GetResponse Free Plan vs Paid Plans
Understanding which features are available on each plan is essential to knowing how to use GetResponse without hitting unexpected limits. One of the most common frustrations new users encounter is building a workflow only to discover it requires an upgrade.
Free account / 14-day trial (confirmed from getresponse.com/pricing): up to 500 contacts, 2,500 newsletters/month, unlimited landing pages with a 1,000 unique visitor/month cap, GetResponse badge on all messages. During the first 14 days you can test premium features including marketing automation — but these are trial-only. After the trial, automation access reverts to basic limits unless you upgrade to a paid plan. Live chat support 7AM–11PM weekdays.
Starter plan (from $19/month for 1,000 contacts): Removes GetResponse badge, unlimited emails, landing pages with unlimited visitors and A/B testing. One custom automation workflow with up to 6 elements — confirmed from GetResponse’s help documentation. Tags, scoring, courses, and ecommerce tools are not available within Starter workflows. 24/7 support.
Marketer plan (from $59/month for 1,000 contacts): Unlimited automation workflows, advanced segmentation, abandoned cart, ecommerce features, multi-user access up to 5 users.
Creator plan (from $69/month for 1,000 contacts): Everything in Marketer plus webinars up to 100 attendees (300 with add-on), online course creation, paid newsletters, content monetisation tools.
The most important plan decision for a new affiliate site: Starter is sufficient for a single lead magnet funnel. The moment you need a second automation sequence — a second lead magnet, a re-engagement campaign, a product launch sequence — you need Marketer. Build for where you are going, not just where you are now.
Simple plan recommendation: Use the free trial to build and test everything. Use Starter if you only need one simple funnel. Use Marketer when you need multiple lead magnets, segmentation, or more than one automation workflow. Use Creator only if webinars, courses, or paid newsletters are part of your business model. For a complete breakdown, see our GetResponse pricing guide. According to G2 reviews from verified GetResponse users, ease of automation setup and quality of customer support are the two most consistently cited strengths across thousands of reviews.
Common GetResponse Mistakes to Avoid
Mistake 1: Not Authenticating Your Domain First
Every email sent before domain authentication is a potential deliverability problem. Configure DKIM and SPF on day one — before sending your first test email. It takes 10 minutes to set up and 48 hours to propagate. Start this on your first login so it is verified by the time you are ready to send.
Mistake 2: Not Connecting the Autoresponder Cycle on Your Landing Page
Subscribers opt in through your landing page and receive nothing — because the autoresponder cycle toggle was left off in the Subscription settings screen. Always test your own landing page by submitting your email address and confirming you receive the delivery email before sending traffic.
Mistake 3: Creating Multiple Lists Instead of Using Tags
Multiple lists inflate your contact count, complicate automation, and make cross-list campaigns impossible. One list with tag-based segmentation handles every use case a new affiliate site needs. Tags are applied through automation triggers — when a subscriber clicks a specific link, they receive a tag that routes them into a relevant sequence.
Mistake 4: Hitting the Starter Plan Automation Limit
The Starter plan includes one custom automation workflow. If you build your entire welcome sequence on Starter and then want to add a re-engagement campaign, you cannot — you need to upgrade to Marketer first. Plan your automation architecture before choosing your plan, not after you hit the limit mid-campaign.
Mistake 5: Using the GetResponse Subdomain for Professional Landing Pages
The free plan publishes landing pages to a GetResponse subdomain. For any professional content site, connect your own domain — available on the Starter plan and above. Domain connection is in Account → Domains → Add Domain. This takes 10 minutes and ensures SEO credit and brand credibility go to your domain, not GetResponse’s.
What To Do Next
If you have followed this guide, you now have: domain authentication configured, a contact list created, a landing page live, an automation workflow running, and an opt-in form on your website. That is a complete email marketing infrastructure. The next step is to drive traffic to your landing page — either by linking to it from your highest-traffic articles, adding a content upgrade to a specific post, or running a simple lead magnet promotion to your existing audience. Once your first 50 subscribers are in and your welcome sequence has run, review the automation statistics to see where subscribers drop off and optimise from there.
Frequently Asked Questions
How do I get started with GetResponse?
Sign up at getresponse.com — the free account activates immediately with a 14-day premium trial included. On day one: authenticate your domain under Tools → Domain Authentication, create your contact list under Contacts → Lists, and start building your landing page. These three steps in that order give you the foundation everything else requires.
Is GetResponse easy to use?
GetResponse is moderately complex for beginners because it does a lot. The email editor and landing page builder are straightforward. The automation builder has a learning curve — most users need 1–2 hours to build their first workflow confidently. The dashboard organises features logically once you understand what each section covers: Email Marketing for campaigns, Automation for workflows, Tools for landing pages and forms, Contacts for list management.
How do I use GetResponse for email marketing?
For email marketing: create a list, build an opt-in form or landing page, set up an automation workflow for new subscribers, and send regular newsletter campaigns to your list. The automation handles the sequences — lead magnet delivery, welcome series, nurture flows — automatically. Newsletters are manually scheduled campaigns for announcements, content updates, or promotional emails. Both run from the Email Marketing section of the GetResponse dashboard.
How do I set up automation in GetResponse?
Go to Tools → Automation → Create Workflow. Choose a pre-built template (recommended for beginners) or start from blank. Set your trigger — typically “Subscribed to list” — then add Send Message, Wait, and Condition blocks to build your sequence. Test by subscribing yourself to confirm the sequence fires correctly. Important: the Starter plan allows one custom workflow. If you need multiple simultaneous sequences, upgrade to Marketer. See our GetResponse automation guide for a step-by-step walkthrough.
How do I create a landing page in GetResponse?
Go to Tools → Landing Pages → Create Landing Page. Choose “By myself” for template selection or the AI builder for a generated draft. Customise in the drag-and-drop editor, click Continue, then configure Subscription settings to connect the page to your list and autoresponder cycle. Publish to your custom domain (paid plans) or GetResponse subdomain (free plan). For a complete walkthrough including the subscription settings that most tutorials skip, see our GetResponse landing page guide.
What should I do first in GetResponse?
In order: authenticate your domain (Tools → Domain Authentication), create your contact list (Contacts → Lists), build your landing page (Tools → Landing Pages), configure the automation workflow for lead magnet delivery (Tools → Automation), then add opt-in forms to your website. This sequence in this order avoids the most common setup mistakes and gets you to a functioning email marketing system within the 14-day trial window.
How do I add GetResponse to WordPress?
Two methods: install the official GetResponse WordPress plugin (search “GetResponse” in Plugins → Add New) which connects your WordPress site to your GetResponse account and lets you embed forms directly from the plugin. Or use the JavaScript embed code from any form you create in GetResponse (Tools → Forms and Popups) and add it via WPCode or your theme’s custom code area. The plugin method is faster for beginners; the code method gives more placement control.
Related GetResponse Articles
- GetResponse Review 2026: The Honest Verdict for Affiliate Marketers
- GetResponse Pricing in 2026: Plans, Features & What You Actually Pay For
- GetResponse Free Plan: The Honest 2026 Guide
- GetResponse Landing Page Builder: Complete 2026 Guide
- GetResponse Automation: 7 Proven Steps for Affiliate Marketing
- How to Build an Email Funnel with GetResponse (Step-by-Step)
This guide is based on direct use of GetResponse for InnovateHub Finance as of May 2026. Feature availability and pricing are subject to change — always verify current plan details at getresponse.com/pricing before making decisions.
